
In this guide I’ll show you how to install Docker on a Raspberry Pi running Ubuntu Server Edition for a complete Docker portable. We’ll also deploy an Apache HTTP server, and I’ll give you some good resources to learn from.
FYI: Docker is an application that enables “containerized” apps similar to a virtual machine. Docker has an image repository of thousands of pre-configured applications like Apache HTTP server (which we’ll install later in this guide), Ubuntu, Python, Postgres, Node.js, and many others (I’ll give you links at the end of this tutorial).
Contents
- Prerequisites
- Install Docker
- Add User ‘pi’ to Docker Group
- Deploy ‘Hello World’ Container
- Deploy Apache HTTP Server Container
- Conclusion
- See Also
- Further Reading
Prerequisites
- You’ll need a a RPi-3, RPi-4, RPi-400, or Zero
- Your RPi will need Ubuntu Server Edition installed
Install Docker
Before we install Docker, let’s update the cache and upgrade software:
sudo apt update && sudo apt upgrade -yLet’s install some required software that apt needs to upgrade packages over HTTPS:
sudo apt install curl ca-certificates apt-transport-https software-properties-commonLet’s add the Docker GPG key:
curl -fsSL https://download.docker.com/linux/ubuntu/gpg | sudo gpg --dearmor -o /usr/share/keyrings/docker-archive-keyring.gpgAnd add the Docker repo to the sources.list file:
echo "deb [arch=$(dpkg --print-architecture) signed-by=/usr/share/keyrings/docker-archive-keyring.gpg] https://download.docker.com/linux/ubuntu $(lsb_release -cs) stable" | sudo tee /etc/apt/sources.list.d/docker.list > /dev/nullLet’s update the apt cache now that we have the Docker repo source:
sudo apt updateAnd install Docker community edition:
sudo apt install docker-ce -yLet’s make sure everything went OK and Docker is installed and running:
sudo systemctl status docker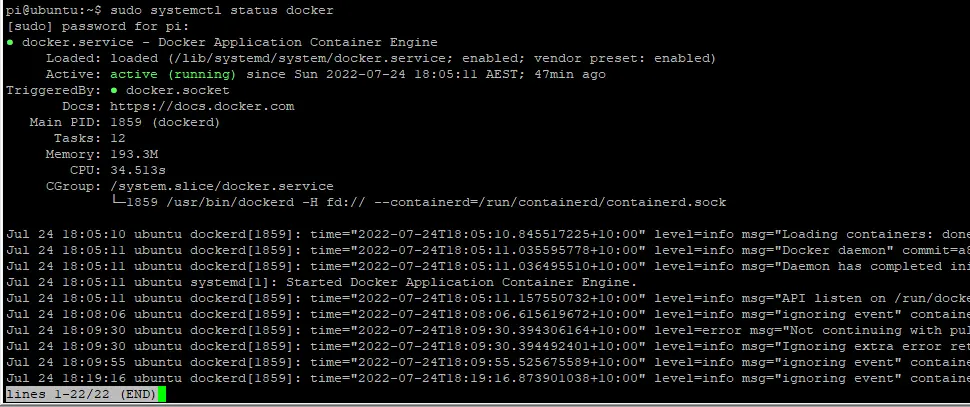
Add User ‘pi’ to Docker Group
So that you don’t have to add sudo for Docker commands, we add user pi to the Docker group (we’re using the ${USER} variable to reference the current user pi):
sudo usermod -aG docker ${USER}Then apply the changes by logging in and out (you’ll need to enter your password):
su - ${USER}Let’s make sure your user was added to the Docker group:
groups ${USER}
Deploy ‘Hello World’ Container
Let’s deploy our first Docker container called “Hello World” which will display a greeting from Docker on the screen. First, we “pull” the image from the Docker repo:
docker pull hello-worldThen deploy the container:
docker run -it hello-world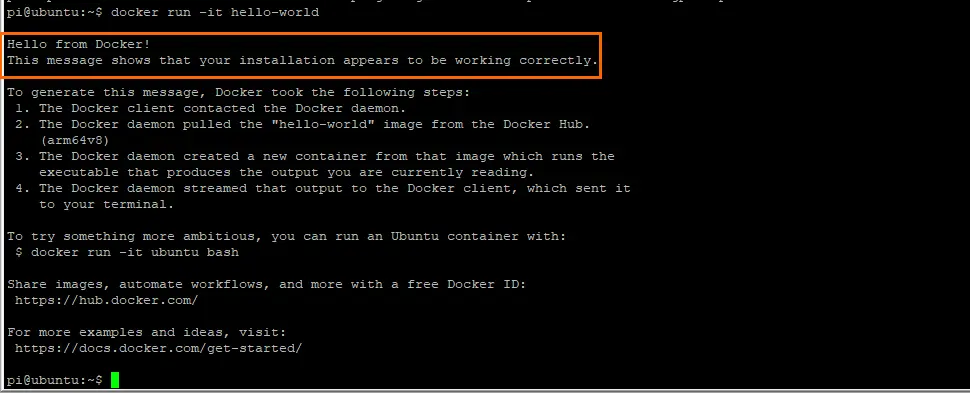
Deploy Apache HTTP Server Container
Now for something a little more serious, let’s deploy the Apache HTTP server container. First, let’s pull the image:
docker pull httpdLet’s check that we have httpd and hello-world images available:
docker images
Now we deploy the httpd container. I will give an explanation of each option:
-d– Run in detached mode--name– The name of the deployment, I have named itapache-httpd-p– Map local computers port to Apaches port, in this case port 8080:80-d– Use the Apache imagehttpd
docker run -d --name apache-httpd -p 80:80 -d httpdYou should see the Apache container ID:

Let’s see if Apache is working. We need to find the IP address of your Raspberry Pi, enter the ip address command:
ip address
Look for the eth0 interface which will show your RPi’s IP address. Enter the IP address into your web browser and hit ENTER (you may get a security warning, click Continue)

If you get the default Apache test page “It Works!” then you’re good to go. To stop the Apache instance, use the following command:
docker stop apache-httpdConclusion
I hope you enjoyed this introduction to Docker on Raspberry Pi and if you want to learn more, look at the Further Reading section below and check out this Getting Started Guide. If you ran into any trouble, hit me up in the comments or socials/email and don’t forget to sign up to my newsletter for all the latest news and guides delivered to your inbox: Newsletter Sign Up.
See Also
- Install Ubuntu 22.04 Server Edition on Raspberry Pi
- Host a Website on a Raspberry Pi
- Raspberry Pi LAMP Server – Complete Guide
Comments
There are currently no comments on this article.
Comment