
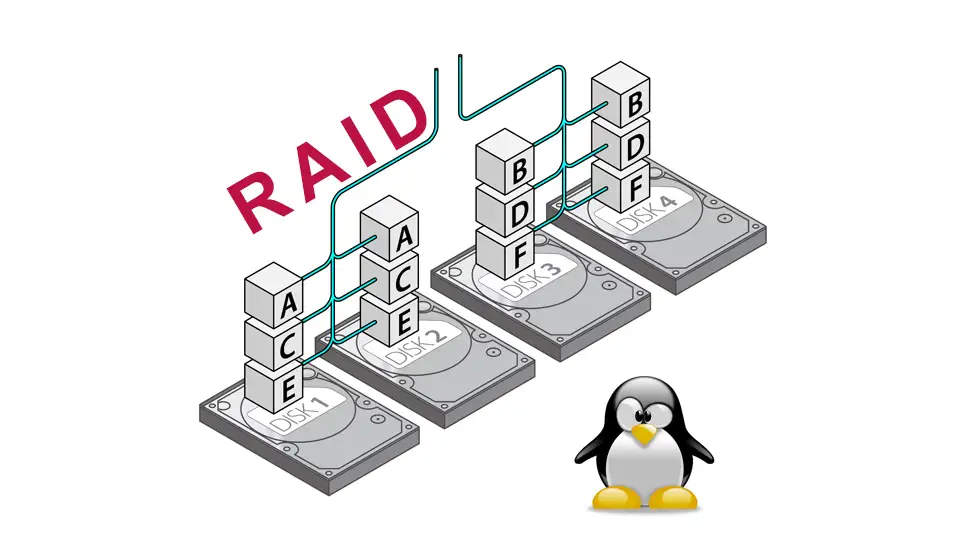
Today I’ll show you how to build a Linux software RAID array using mdadm on Ubuntu, however, this will work on any Debian/Ubuntu based system (including Raspberry Pi OS). RAID provides redundancy in case of disk failure, however, RAID is not backup. RAID is an acronym for Redundant Array of Inexpensive Disks, although the inexpensive part is not the case with enterprise RAID, which can use large and expensive disks.
Contents
- Recommended Books
- Hard Drives
- RAID Levels
- Install mdadm
- Create RAID Array
- Confirm Your RAID Array
- Create File System
- Create Mount Point and Mount File System
- Save Array and Mount at Boot
- Remove RAID Array
- Conclusion
- See Also
- Further Reading
Recommended Books
I can highly recommend these books on Linux Administration if you want to go further.
- The Linux Bible 10th Edition
- The Linux Command Line, 2nd Edition: A Complete Introduction
- Linux Administration: The Linux Operating System and Command Line Guide for Linux Administrators
Hard Drives
You will need at least two blank hard drives installed on your system, separate from your operating system drive. These can be 2.5 or 3.5 inch, SATA, SAS or M.2, but most importantly, the same transfer type (SAS, SATA etc.), the same size in Gigabytes, and preferably the same brand and model.
In terms of drive size, your budget will be the determining factor, so just get what you can afford. Remember that with RAID-0, you get the total amount of all drives put together, so 2× 64GB drives will give you 128GB. RAID-1 will halve your total capacity, so 2× 64GB drives will give you 64GB. RAID-5/6 will give you roughly 2/3 of total capacity, so 3× 64GB drives will give you roughly 128GB of storage. RAID-10 will halve your total capacity, so 4× 64GB drives will give you 128GB storage (more about RAID levels further below).
RAID Levels
The number of drives you have will determine what RAID level you’ll be able to create. I suggest at least 3 drives, which is the minimum required for a RAID-4/5 array that offers a good balance between redundancy and speed. If you only have 2 drives, I suggest using redundant RAID-1 rather than RAID-0, which has no redundancy.
If you’re confident in your Linux skills, you can create a RAID-10 array with 4 drives, which is 2 sets of RAID-1, then each set is used to form a RAID-0 array giving you the benefit of speed and redundancy. I will show you how to create all types of Linux RAID arrays.
| Number of Drives | RAID Level Availability |
|---|---|
| 2 |
|
| 3 |
|
| 4 |
|
Install mdadm
Open Terminal or SSH into your machine and run update/upgrade first:
sudo apt update && sudo apt upgrade -yThen install the mdadm RAID package (it may already be installed as in Ubuntu server edition):
sudo apt-get install mdadm -yCreate RAID Array
IMPORTANT NOTES
- If you receive the error “the drive is in use and cannot be formatted”, it’s likely you already have a RAID array. If so, look at Removing a RAID array section. If you haven’t previously created a RAID array, you may need to format/wipe the disk. See instructions for Linux, Windows, macOS
- After creating your RAID array, it will not yet be mounted or have a file system, those steps are further below.
We need to identify each drive by there size and note their mount points (I have created 2× 30GB drives on my virtual machine). Enter the following command to see yours:
lsblkWhich should produce something like this (remember that mount points can change if you reboot/shutdown):
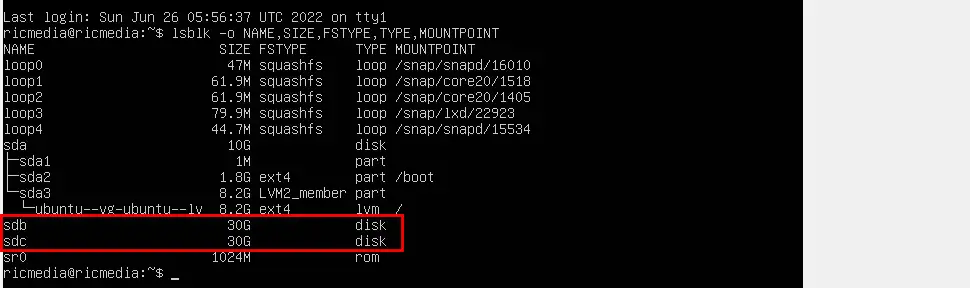
My mount points are sdb and sdc. If you have different mount points than shown here, it doesn’t really matter, you’ll just need to replace the code snippets with the mount points you have.
mdadm Options Explained
mdadm has many options, some of which I have given explanations below:
sudo mdadm --createStarts the mdadm app with root privileges, and invokes the create command--verboseForces mdadm to give you more information on screen during the creation process/dev/md0The location/dev/and name/md0of your RAID array.--level=XThe RAID level you want. ReplaceXwith either 0, 1, 4, 5, 6, or 10--raid-devices=XHow many drives are in the RAID array. ReplaceXwith the number of drives in your RAID array/dev/sda1 /dev/sdbThe location of drives in your RAID array--spare-devices=1 /dev/sddA hot spare incase of drive failure.
Depending on how many drives you have, follow the instructions for your chosen RAID level below, then skip to the Confirm RAID array section.
Set up RAID-0 Volume
To setup two or more drives into a high-performance RAID-0 array in parallel, replace --raid-devices=X with the number of drives you’re using, and /dev/sdb /dev/sdc with your mount points:
sudo mdadm --create --verbose /dev/md0 --level=0 --raid-devices=2 /dev/sdb /dev/sdcYou should see array /dev/md0 started.

If I were using 4 drives in my RAID-0 array, the code would be:
sudo mdadm --create --verbose /dev/md0 --level=0 --raid-devices=4 /dev/sdb /dev/sdc /dev/sdd /dev/sdeSet up RAID-1 Volume
To setup a redundant RAID-1 array using two drives, enter the following code:
sudo mdadm --create --verbose /dev/md0 --level=1 --raid-devices=2 /dev/sdb /dev/sdcSet up RAID-4/5/6 Volume
To setup a redundant RAID-4, RAID-5 with three drives, or RAID-6 array with four drives, use the following code, replacing --level=X with the RAID level you want:
sudo mdadm --create --verbose /dev/md0 --level=4 --raid-devices=3 /dev/sdb /dev/sdc /dev/sddAdd a Hot Spare Drive
If I wanted a RAID-5 array using three drives and a hot spare, I would use the following code:
sudo mdadm --create --verbose /dev/md0 --level=5 --raid-devices=3 /dev/sdb /dev/sdc /dev/sdd --spare-devices=1 /dev/sdeSet up RAID-10 Volume
To setup a fast, redundant RAID-10 (aka Nested RAID-1+0) use the following code:
sudo mdadm --create --verbose /dev/md0 --level=10 --raid-devices=4 /dev/sdb /dev/sdc /dev/sdd /dev/sdeConfirm Your RAID Array
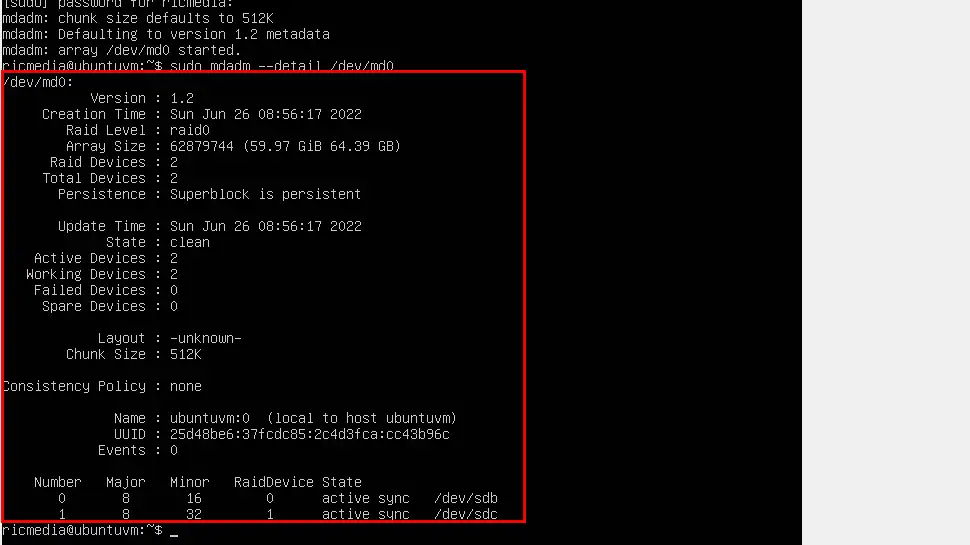
let’s confirm your RAID array with the following command:
sudo mdadm --detail /dev/md0Which should produce something like this:
Create File System
You have a number of choices when it comes to Linux file systems. I will be using the EXT4 file system. Enter the following code, or go to the next step for a more complex way to create a file system:
sudo mkfs.ext4 -F /dev/md0The following code will produce an EXT4 filesystem with a block size of 4096kb, stride of 32, a stripe-width of 64 and will leave 1% free so it won’t fill up and cause issues:
sudo mkfs.ext4 -v -m .1 -b 4096 -E stride=32,stripe-width=64 /dev/md0If you want to learn more about mkfs flags (stride, stripe-width, block options) see this article.
If successful, you should see the following output (accounting information can take a minute or two depending on the size of the volume):

Create Mount Point and Mount File System
We need to create a mount point before mounting the file system:
sudo mkdir -p /mnt/md0Now let’s mount the file system:
sudo mount /dev/md0 /mnt/md0Let’s check if the RAID array is online and available:
df -h -x devtmpfs -x tmpfsWhich should look like this:

Save Array and Mount at Boot
We need to automatically mount the file system at boot, so let’s add it to mdadm.conf:
sudo mdadm --detail --scan | sudo tee -a /etc/mdadm/mdadm.confNext, we update initramfs so the RAID array is available at boot time:
sudo update-initramfs -uLastly, we save the new file system in /etc/fstab for automatic booting. Let’s backup the current fstab first:
sudo cp /etc/fstab /etc/fstab.bakThen update fstab:
echo '/dev/md0 /mnt/md0 ext4 defaults,nofail,discard 0 0' | sudo tee -a /etc/fstabTry rebooting your machine and run the df -h -x devtmpfs -x tmpfs command, which should show md0 as mounted and available:

Remove RAID Array
If you want to try a different RAID level after following this guide, it’s important to note that you will need to reverse the RAID process before attempting a new RAID array.
We first see what RAID arrays are currently loaded, and the result:
cat /proc/mdstat
Let’s unmount the RAID array:
sudo umount /dev/md0Then stop the RAID array:
sudo mdadm --stop /dev/md0We then run the lsblk command to see what mount points our drives are using:
lsblk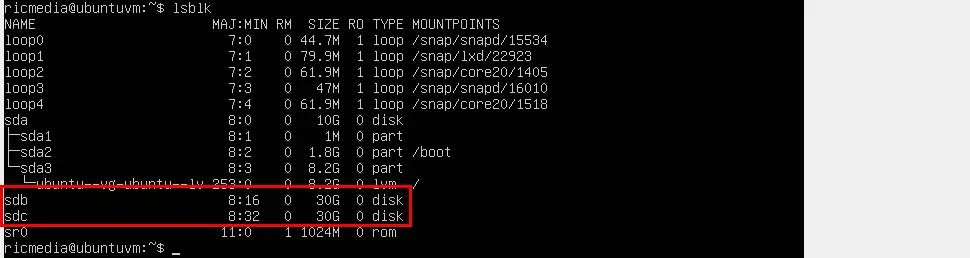
My two 30GB drives are using sdb and sdc mount points. Let’s remove any RAID metadata from the drives using the --zero-superblock command:
sudo mdadm --zero-superblock /dev/sdbsudo mdadm --zero-superblock /dev/sdcNow let’s remove any persistent references to the RAID array, starting with fstab. You can either delete the line entirely, or comment it out with the # symbol, which is what I chose to do:
sudo nano /etc/fstab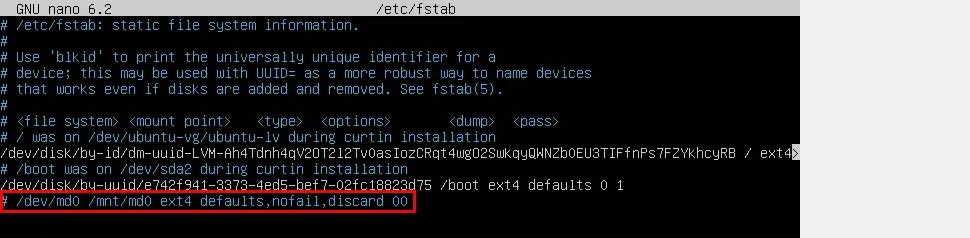
Then save ctrl + o, ENTER and exit nano ctrl + x.
We also need to remove a line from mdadm.conf, so go ahead and open, then comment out or delete the /dev/md0 line:
sudo nano /etc/mdadm/mdadm.conf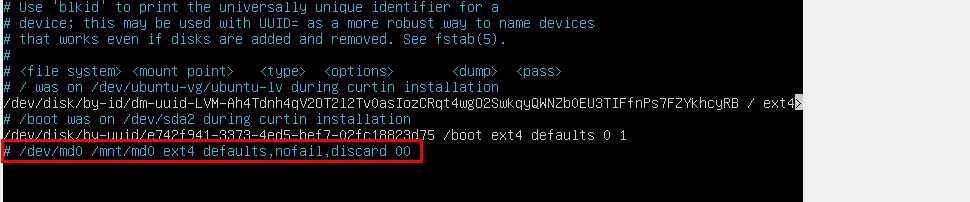
Then save ctrl + o, ENTER and exit nano ctrl + x.
Finally, we need to update initramfs:
sudo update-initramfs -uDone. Now you can reboot your machine and try another type of RAID array.
Conclusion
Hopefully you now have a RAID array on your machine. Try some of the other RAID levels too and be sure to explore the help and further reading below. If you had any trouble, hit me up in the comments, or socials/email.
Comments
Dave Comer #
I set up mdadm on a Raspberry Pi 4 8GB running Ubuntu 22.04 server, using the Argon m.2, internal WD 500GB SSD (/root), and an external MediaPlex 4-bay drive enclosure (USB 3 connected) containing 4 4TB WD Red drives. I used your RAID 5, 3 disks + 1 hot spare and it went great! Thank you so much for your article!
Richie Brereton #
Hi Dave, so glad it worked out well for you. Thanks for your feedback!
Comment