

Today, I’ll show you three methods to set custom DNS servers on Ubuntu, including instructions to reset your connection back to defaults if you need to. Below each guide is a video version for further explanation.
Contents
- Recommended Books
- Set DNS servers with Network Manager
- Set DNS servers with Netplan, Network Manager and static IP
- Set custom DNS using Netplan and networkd
- Reset your Ethernet connection back to defaults
- Conclusion
- See Also
- Further Reading
Recommended Books
I can highly recommend these books on Linux Administration if you want to go further.
- The Linux Bible 10th Edition
- The Linux Command Line, 2nd Edition: A Complete Introduction
- Linux Administration: The Linux Operating System and Command Line Guide for Linux Administrators
Set DNS servers with Network Manager
This is the easiest way to set custom DNS servers on Ubuntu and the preferred method because you’re not messing with any system files, which can lead to trouble if you’re not Linux savvy. Please note that each version of the Ubuntu GUI is slightly different so you may need to improvise. The screenshots below are from Ubuntu 20.04 LTS.
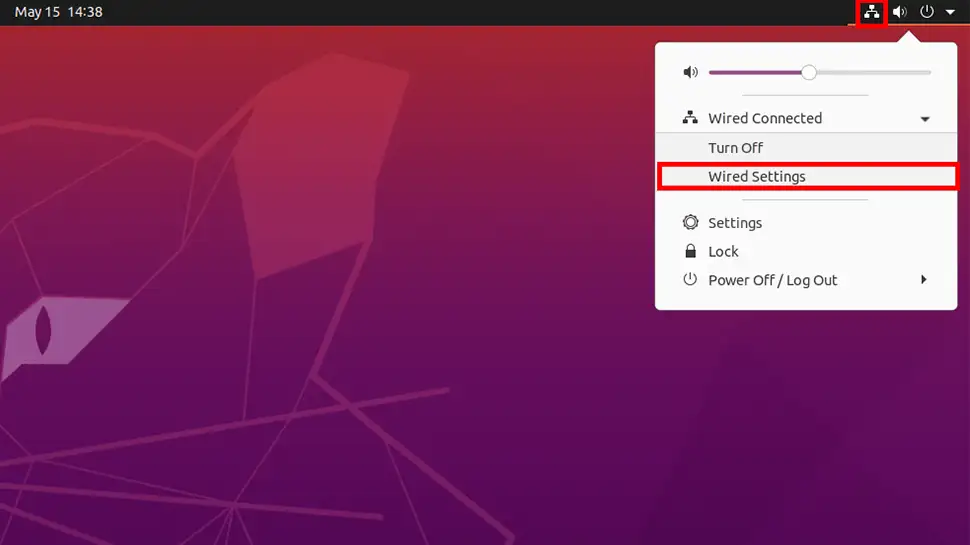
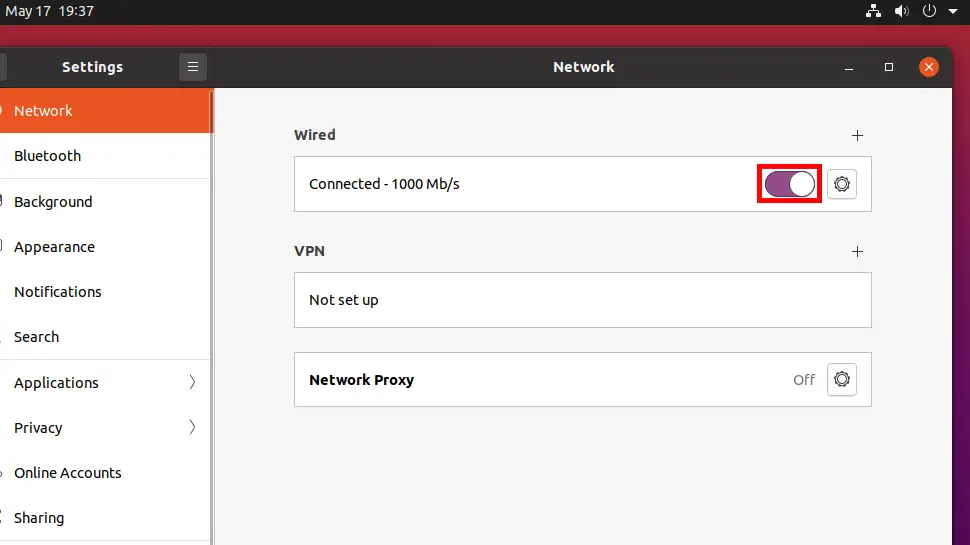
- Click the Network icon top-right of your screen, then Wired Connected -> Wired settings (Or Wi-Fi Adapter)
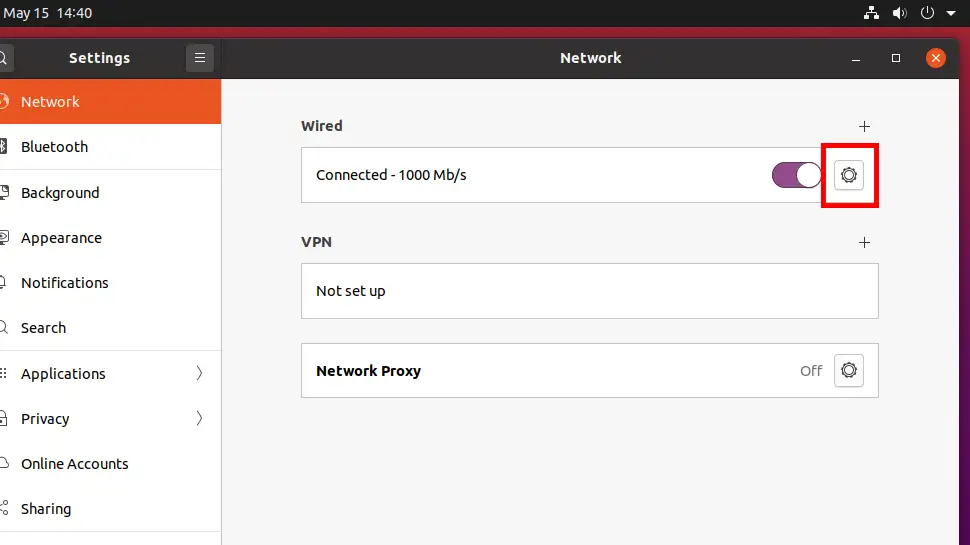
- Click the Gear icon under the Wired or Wi-Fi heading
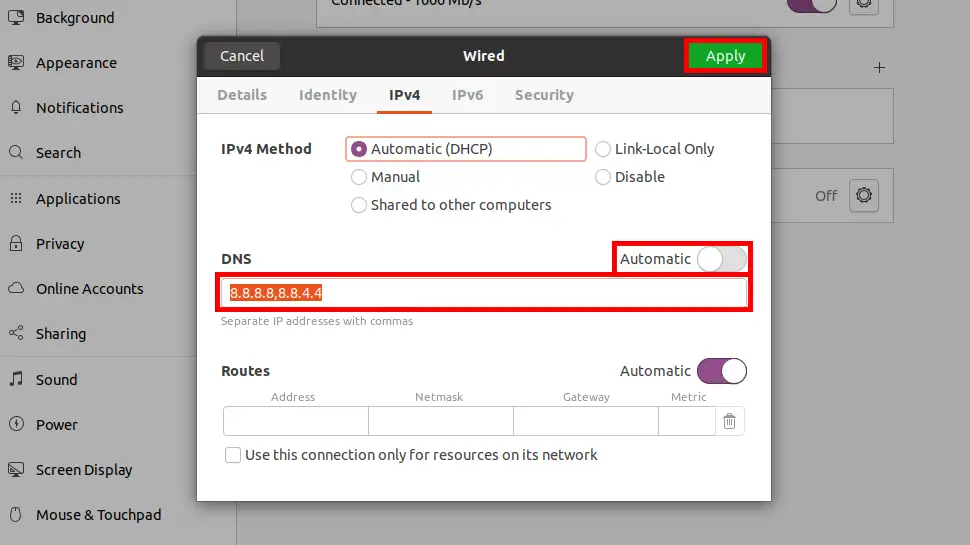
- Click the IPv4 tab and enter your custom DNS server IP addresses, separated by a comma, then toggle the Automatic button and click Apply
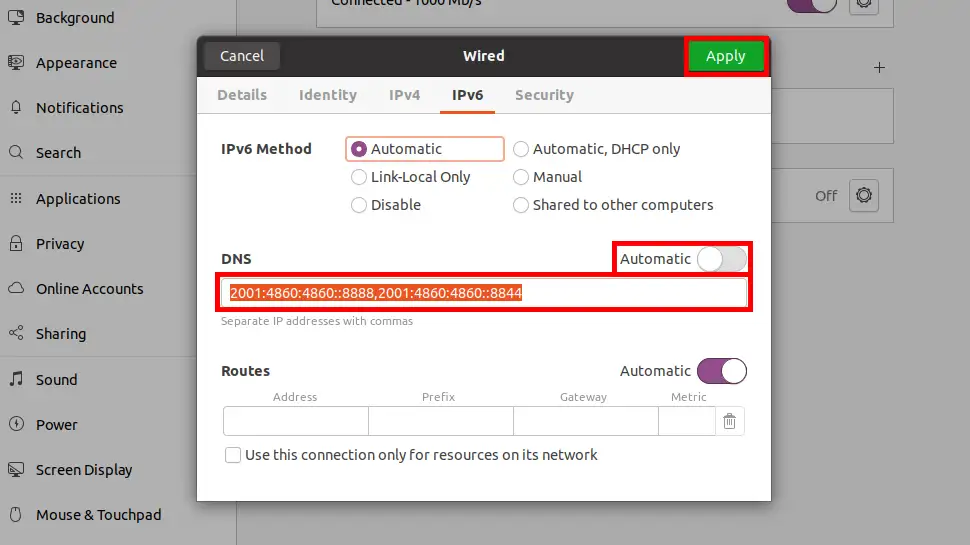
- (Optional) Click the IPv6 tab and enter your custom DNS server IP addresses, separated by a comma, then toggle the Automatic button and click Apply. Note: If you don’t have IPv6 IP addresses you can disable IPv6 altogether with no negative effect: IPv6 Method -> Disable -> Apply
- Toggle the LAN/Wi-Fi connection off and on
- Open up a Terminal window and enter the following command:
systemd-resolve --status, then hit the END key on your keyboard (or just keep hitting Enter till you get to the last line). You should see your Ethernet/W-Fi interface listed with the DNS servers you set earlier, mine is Link 2 (enp0s3):
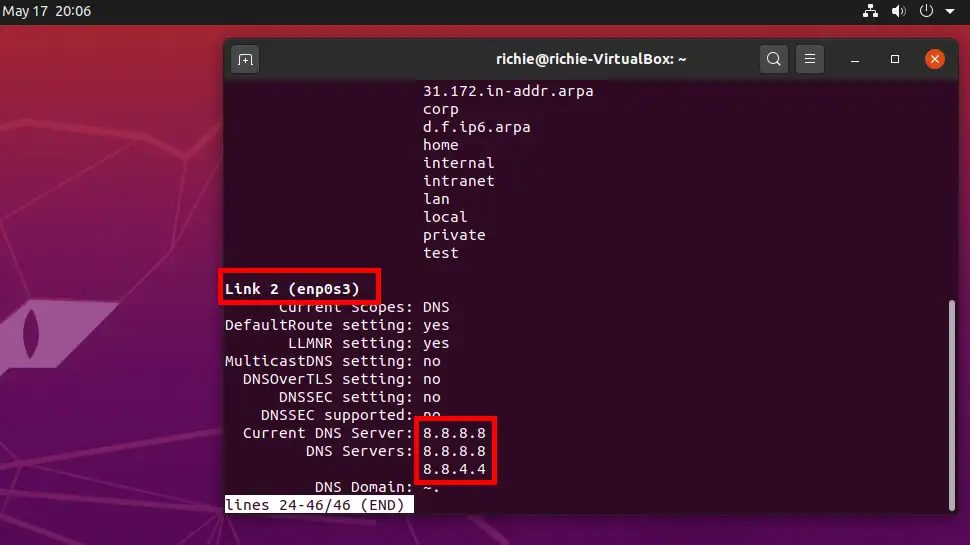
#If you don’t see your DNS servers listed, please make sure you followed all the steps in this guide. If you still have trouble, drop a comment further below.
Video: Set DNS servers with Network Manager
Set DNS servers with Netplan, Network Manager and static IP
Note* As of 18/05/2020 Network Manager doesn’t respect the Netplan option nameservers: addresses [8.8.8.8,8.8.4.4] option even when you specify dhcp4-overrides: use-dns: false, it still uses (and give priority to) the default DHCP DNS servers. This renders any custom DNS servers redundant. The only way around this AFAIK is to specify the Ethernet connection as static. Please comment or email me if you have found otherwise.
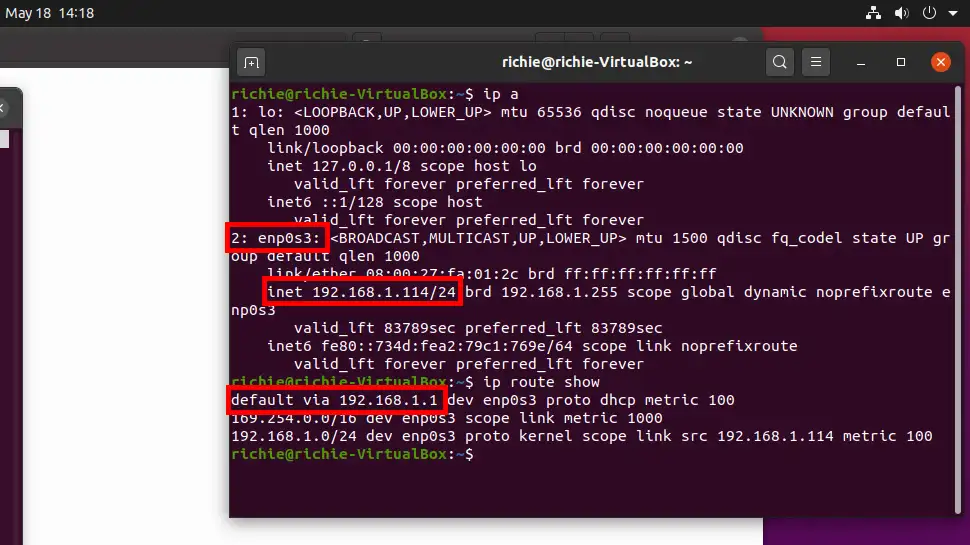
- Open up a Terminal window and enter:
ip ato list your current Ethernet/W-Fi connection details. Find your wired/Wi-Fi link name, mine isenp0s3and just under that, you’ll see the IP address and netmask, mine isinet 192.168.1.114/24. Enterip route showto reveal your default gateway, mine isdefault via 192.168.1.1. Keep this window open or write down the IP, netmask and default gateway.
- Open File Manager and navigate to
/etc/netplan, right-click and choose Open in Terminal. Enter thedircommand, then select and copy the*.yamlfile name to clipboard. Entersudo nano [filename].yamlto open your Netplan config file (paste the file name from clipboard).
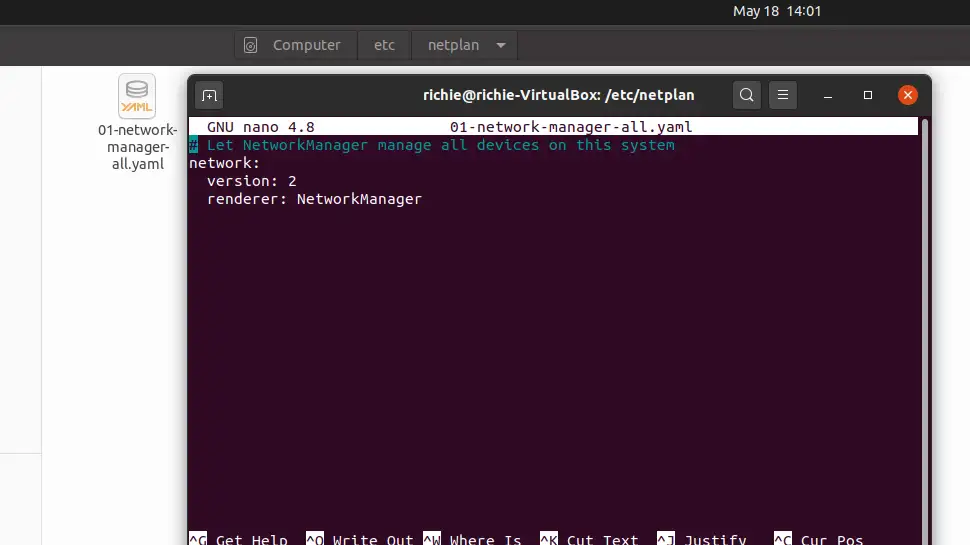
- Copy and paste the code below and change everything in CAPS to your own. Indenting is critical for YAML so if you copy/paste be sure to keep the formatting. If you do lose formatting, make sure you indent using the space bar not TAB otherwise YAML will throw an error.
network:
    version: 2
    renderer: NetworkManager
    ethernets:
       [DEVICE_NAME]:
          dhcp4: false
          addresses: [IP_ADDRESS/NETMASK]
          gateway4: GATEWAY_IP
          nameservers:
             addresses: [NAMESERVER_1, NAMESERVER_2]
My details are as follows:
network:
    version: 2
    renderer: NetworkManager
    ethernets:
       enp0s3:
          dhcp4: false
          addresses: [192.168.1.114/24]
          gateway4: 192.168.1.1
          nameservers:
             addresses: [8.8.8.8, 8.8.4.4]
Then save ctrl + o, ENTER and exitnanoctrl + x. Now apply the changessudo netplan apply. If you get a warning you may have used TAB instead of space bar, or you have a syntax error, open the YAML file up and double check everything. If you get nothing but a new line on command prompt, you’re good to go. - Once your YAML code has been applied without errors, enter
systemd-resolve --statusand confirm you’re using specified DNS servers:
Video: Set DNS servers with Netplan, Network Manager and static IP
Set custom DNS using Netplan and networkd
Using this method you’ll lose the Network Manager GUI and network icon, so only use if necessary (I recommend methods 1 or 2).
- Open File Manager and navigate to
/etc/netplan, right-click and choose Open in Terminal. Enter thedircommand, then select and copy the*.yamlfile name to clipboard. Entersudo nano [filename].yamlto open your Netplan config file (paste the file name from clipboard):
- Copy and paste the code below replacing CAPS with your values (take note the renderer is changed to networkd), but please make sure you indent using the space bar not TAB otherwise YAML will throw an error:
network:
    version: 2
    renderer: networkd
    ethernets:
       [DEVICE_NAME]:
          dhcp4: true
          nameservers:
             addresses: [NAMESERVER_1, NAMESERVER_2]
Mine looks like this:
network:
    version: 2
    renderer: networkd
    ethernets:
       enp0s3:
          dhcp4: true
          nameservers:
             addresses: [8.8.8.8, 8.8.4.4]
Then save ctrl + o, ENTER and exitnanoctrl + x, then apply changes:sudo netplan apply. If you get a warning, it’s likely you’ve used TAB instead of space bar or you have a syntax error, open the YAML file up and double check everything. If you get nothing but a new line on command prompt, you’re good to go. - Once your YAML code has been applied without errors, enter
systemd-resolve --statusto confirm you’re using specified DNS servers:
Video: Set custom DNS using Netplan and networkd
Reset your Ethernet connection back to defaults
If you’ve run into trouble or just want to reset your connection back to defaults, follow these instructions (for methods 2 and 3 only).
- Open File Manager and navigate to
/etc/netplan, right-click and choose Open in Terminal. Enter thedircommand, then select and copy the*.yamlfile name to clipboard. Entersudo nano [filename].yamlto open your Netplan config file (paste the file name from clipboard). - Remove everything, then copy/paste the following code, or enter it manually:
network:
    version: 2
    renderer: NetworkManager
Then save ctrl + o, ENTER and exitnanoctrl + x, then apply changes:sudo netplan apply. If you get a warning, it’s likely you’ve used TAB instead of space bar or you have a syntax error, open the YAML file up and double check everything. If you get nothing but a new line on command prompt, you’re good to go.
Video: Reset your Ethernet connection back to defaults
Conclusion
You should now have custom DNS servers on your Ubuntu PC. If you ran into any issues, hit me up in the comments or socials/email.
See Also
- Connect OpenVPN on Ubuntu 20.04 with Network Manager
- Set permanent DNS nameservers on Ubuntu/Debian with resolv.conf
Comments
There are currently no comments on this article.
Comment