

In this tutorial I’ll show you how to service a Windows PC like the professionals do. I used to be a repair tech (and still do some work for friends) so I know all the tricks of the trade to get a Windows PC running perfectly.
Contents
- Recommended Books
- Remove Unused Apps & Toolbars
- Clear Cache & Cookies
- Run System File Checker
- Run DISM Utility
- Clean Registry
- Antivirus Scan
- Update Windows
- Defragment & Optimize Hard Drive
- Troubleshooting
- Conclusion
- See Also
- Further Reading
Recommended Books
I can highly recommend these books to help you learn more about Windows 10/11.
- Windows 11 For Dummies
- Windows 10 For Dummies
- Windows 11 Bible
- Teach Yourself VISUALLY Windows 10
- The Windows Command Line Beginner’s Guide – Second Edition
Remove Unused Apps & Toolbars
First thing to do when servicing a PC is to remove unused or unwanted applications, and web browser toolbars. Over time, you can end up with any number of apps or toolbars that you didn’t actually knowingly install (parasitic software). Usual suspects are MacAfee Antivirus, Adobe Reader, and Google Chrome.
Remove Apps
Click the magnify icon on your taskbar, then search for Control Panel, or go to Start -> Settings -> Apps -> App Features and scroll through your installed applications. Look for any apps you are certain you didn’t install but be careful, some apps might be critical for your system. Usually they’re pretty obvious by their name “Super Fun Poker” or something similar. To uninstall, click the 3 vertical dots on the right side of each app listing, and choose Uninstall.
Remove Toolbars
I will give you instructions to remove toolbars for the most popular web browsers.
- Google Chrome: Go to Customize & Control (3 vertical dots top-right) -> Settings -> Extensions and click the Remove button for any toolbars you don’t want.
- Mozilla Firefox: Click Menu (hamburger lines top-right) -> Add-ons and themes -> Extensions, and remove any extensions you no longer want. You can also click Plugins and see if there are any plugins that you no longer want.
- Microsoft Edge: Click Settings & more (three horizontal dots top-right) -> Extensions ->, then click Manage Extensions on the popup. You can then remove any extensions you don’t want.
Run ADWCleaner
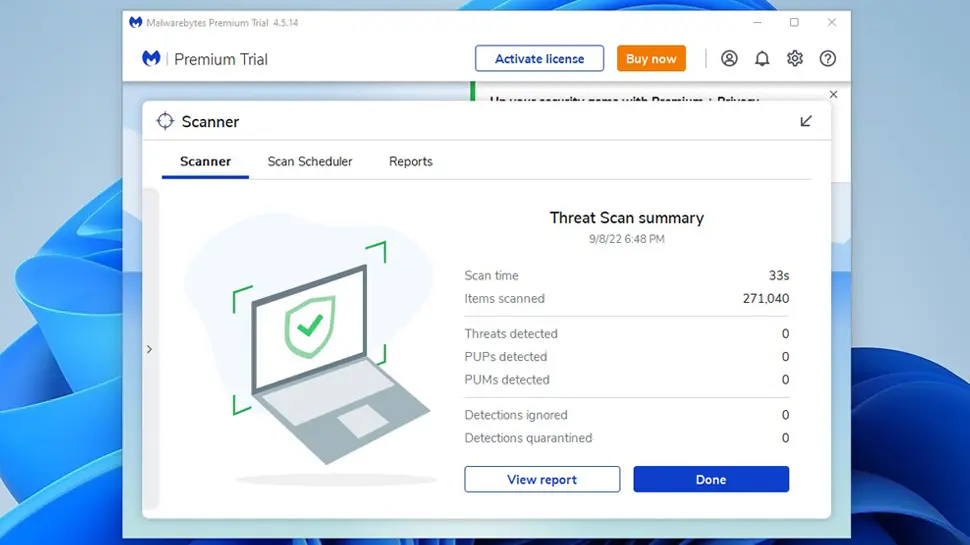
adwCleaner is an excellent tool to remove stubborn applications, malware, adware, and other annoying apps that slow down your PC. I’ve been using it since the original developer’s version, but it’s now been taken over by Malwarebytes and thankfully, it’s still free. Go ahead and download and install AdwCleaner Premium or use the free version
- Click the MalwareBytes icon on your desktop
- Click the Scan button
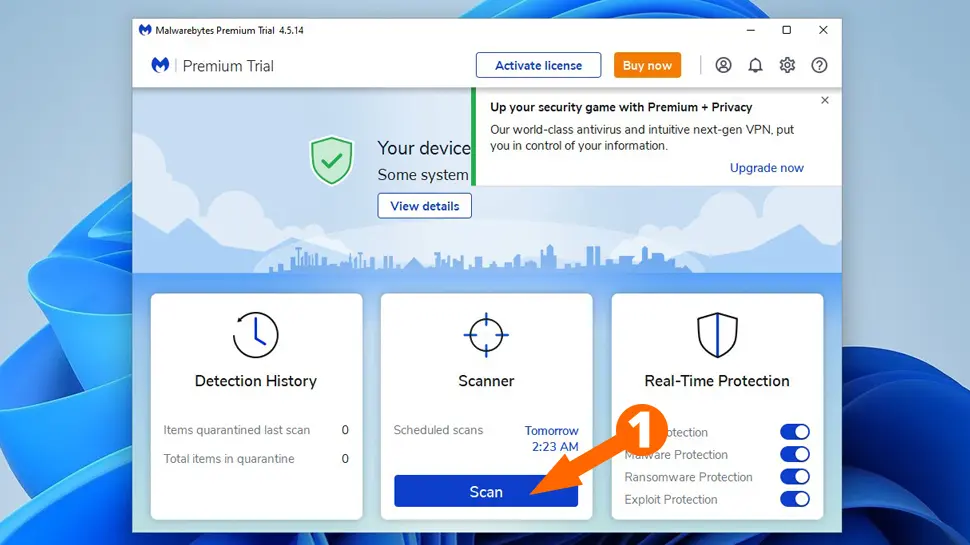
- Once finished, adwCleaner will advise you if it found any threats and guide you to remove them
- You can either leave adwCleaner installed, or remove it after you’ve scanned for threats
Clear Cache & Cookies
I’ll show you two different ways to accomplish this: manually, and using CCleaner. Just a note: by clearing cookies you will likely need to login again to any websites you were previously logged in to, so if you not using a password manager, you’ll need to remember your website passwords.
Manually Clearing Cache & Cookies
- Google Chrome: Go to Customize & Control (3 vertical dots top-right) -> Settings -> Privacy and Security -> Clear Browsing Data, then choose what data you wish to delete. For a more granular information, choose Advanced.
- Mozilla Firefox: Click Menu (hamburger lines top-right) -> Settings -> Privacy & Data ->, then scroll down to Cookies and Site Data and click the Clear Data button.
- Microsoft Edge: Click Settings & more (three horizontal dots top-right) -> Settings -> Cookies and site permissions -> Manage and delete cookies and site data -> See all cookies and site data -> Remove All button.
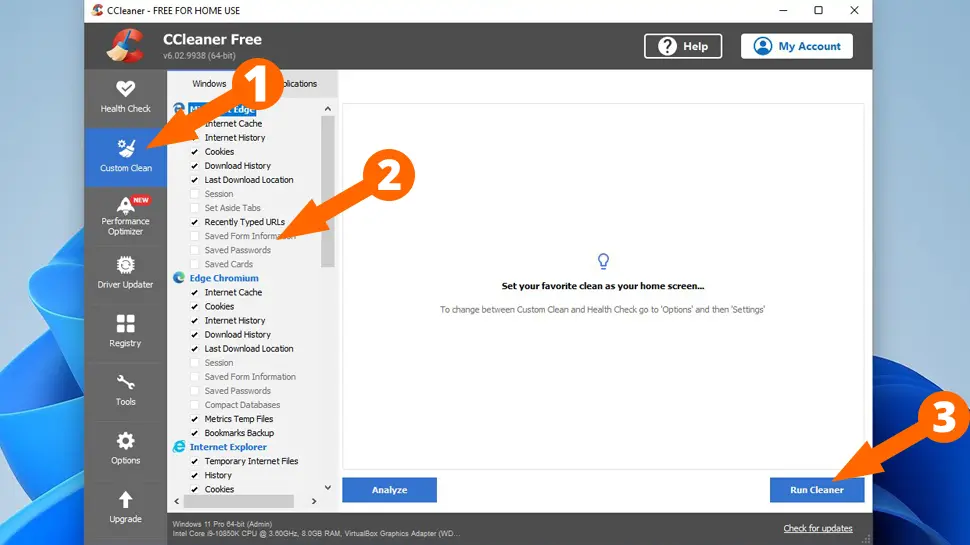
Clear Cache & Cookies with CCleaner
- Download and install CCleaner (buy CCleaner Pro or use the free version)
- Open the app and click Custom Clean from the left-side menu
- Go through and check or uncheck the data/cookies you want to delete (I recommend leaving at defaults), then click the Run CCleaner button
Run System File Checker
Windows built-in System File Checker is a great little tool to make sure all your system files are in good shape and not corrupted. Let’s run it now, which should take between 5 and 20 minutes, depending on the speed of your PC.
- Click the search/magnify icon on your taskbar, then type CMD in the search box
- Right-click on the Command Prompt result and choose Run as Administrator, then click Yes to the UAC prompt
- Type
sfc /scannowin the command prompt and hit ENTER
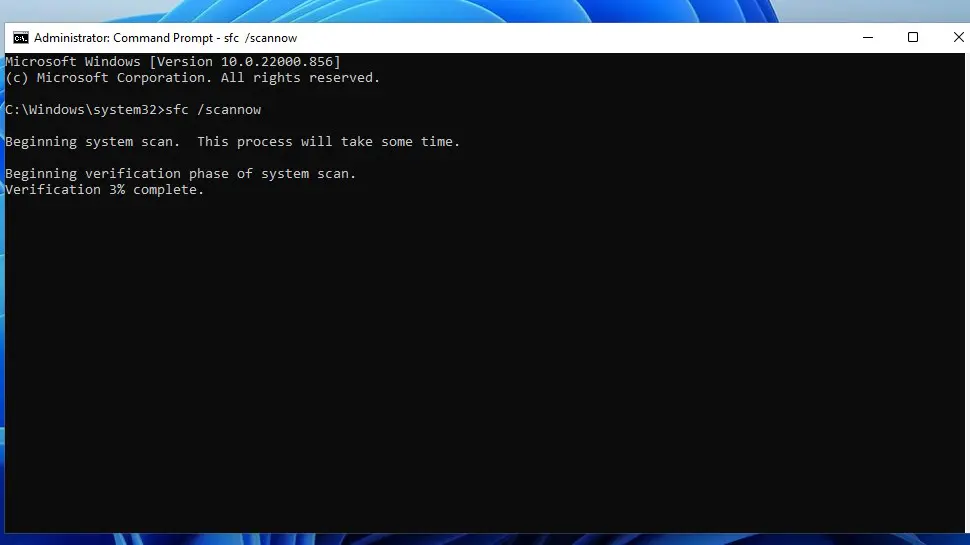
- Once System File Check has completed, you will see one of four results:
- “Windows Resource Protection did not find any integrity violations.” means nothing was found and your system files are fine
- “Windows Resource Protection could not perform the requested operation.” means you need to use System File Checker in Safe Mode
- “Windows Resource Protection found corrupt files and successfully repaired them.” means corrupt files were found and fixed. Be sure to restart your PC.
- “Windows Resource Protection found corrupt files but was unable to fix some of them.” means you need to repair the corrupted files manually. View the results to find the corrupted file(s), and then manually replace the corrupted file with a good copy.
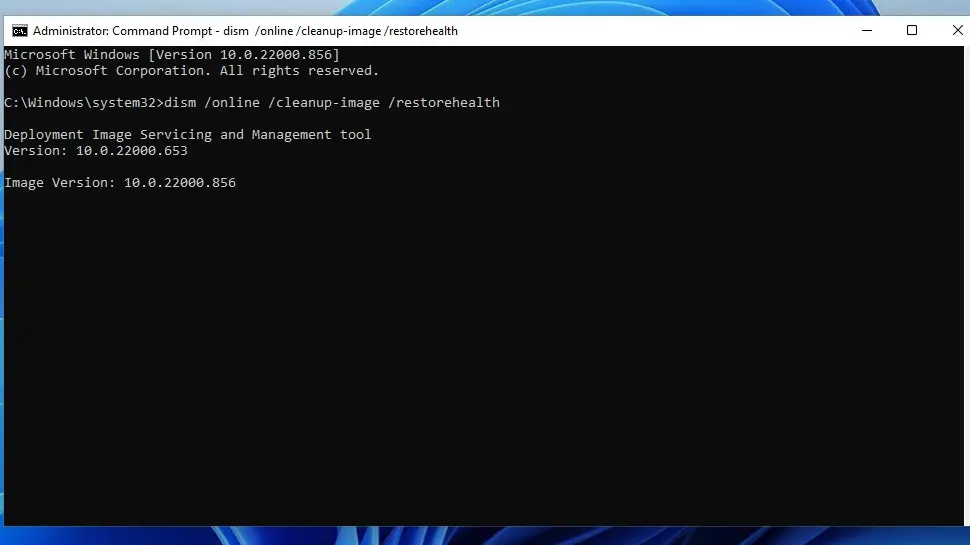
Run DISM Utility
Like the System File Checker tool, the built-in DISM utility makes sure your Windows image isn’t corrupted and repairs any problems it runs in to. It also cleans the registry somewhat, and can fix issues like freezing and BSOD (Blue Screen of Death).
- Click the search/magnify icon on your taskbar, then type CMD in the search box
- Right-click on the Command Prompt result, and choose Run as Administrator, then click Yes to the UAC prompt
- Type
dism /online /cleanup-image /restorehealthin the command prompt and hit ENTER
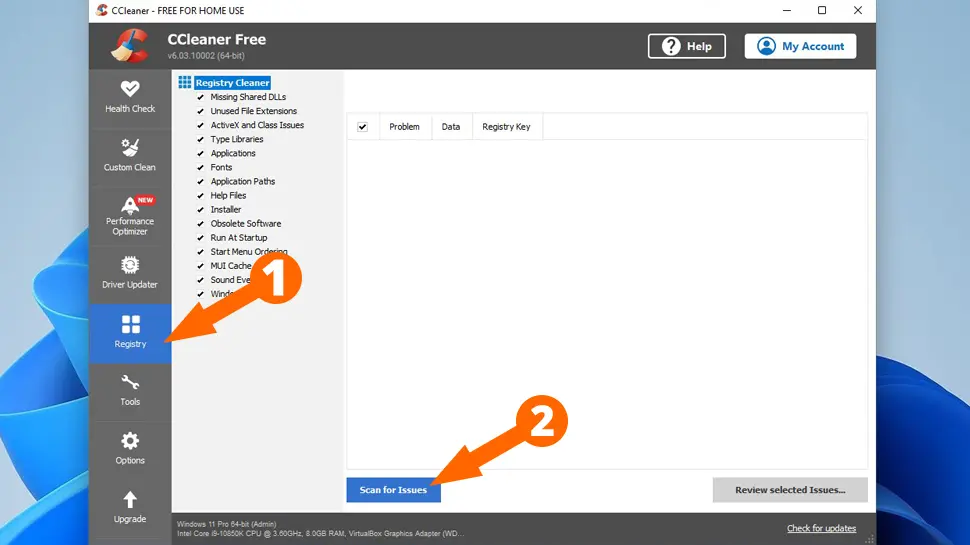
Clean Registry
The only way to clean your Windows registry without using an app is manually, which I don’t recommend, unless you really know what you’re doing. The easiest and safest way is to use an application like CCleaner, which does a stellar job cleaning up your registry, and also gives you the option of backing it up before performing the clean.
- Download and install CCleaner (buy CCleaner Pro or use the free version)
- Open the app and click the Registry icon on the left, then click Scan for issues
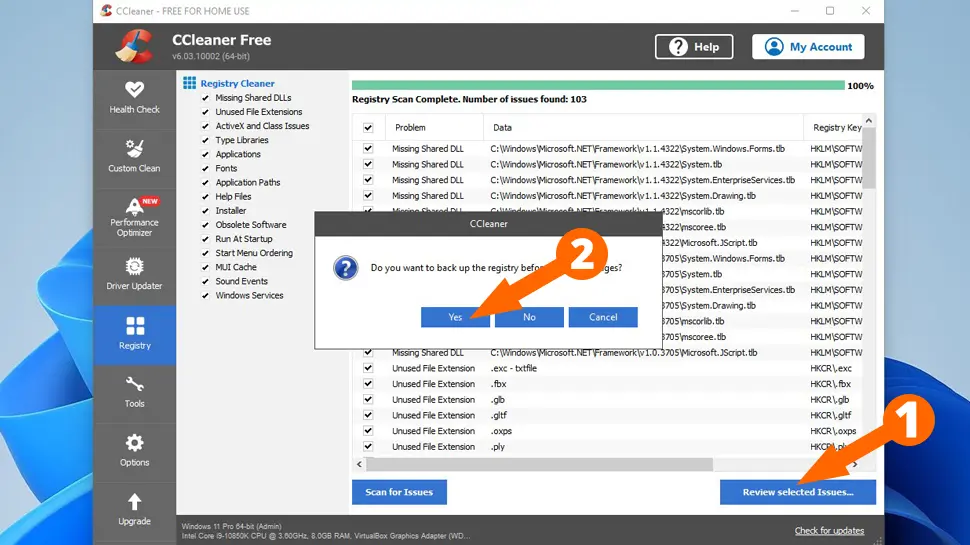
- Once CCleaner has finished scanning, click the Review Selected Issues button, then click Yes to backup your registry
- Click the Fix All Selected Issues button
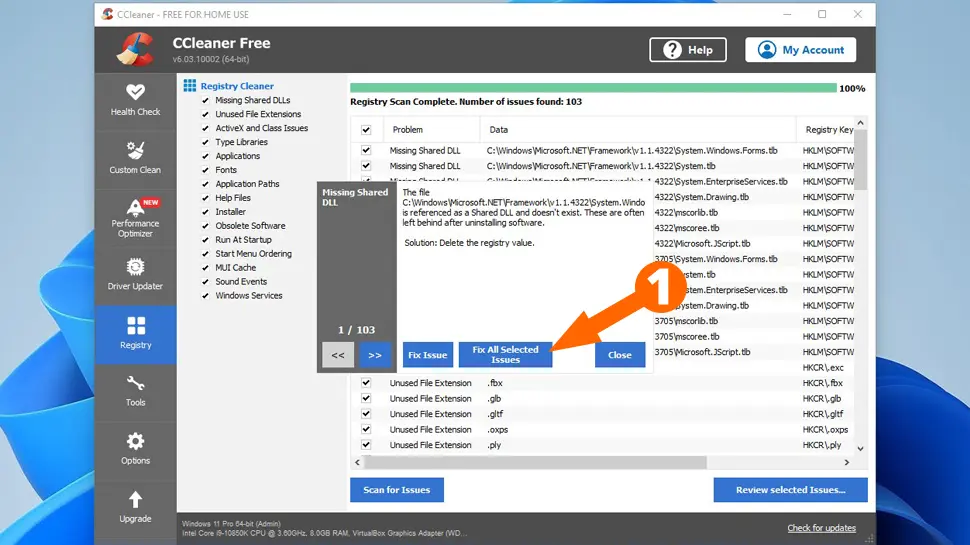
I recommend rebooting your PC after cleaning the registry.
Antivirus Scan
Having a good antivirus is a must nowadays with all the security threats out there. If you already have a good antivirus, then go ahead and run a full scan (not a quick scan). If you haven’t got an antivirus or are not sure, the following companies offer excellent free versions of their antivirus, but be warned: If you already have an antivirus installed and you install another, it will cause all sorts of problems. To check, click the magnify/search icon on your taskbar and search for Control Panel, then click Programs and see if you already have an antivirus installed.
Free Antivirus software
Update Windows
Updating Windows can solve many issues and speed up your PC too. Windows Update has improved many fold since Windows XP, when you could wait for hours just to see what updates were available, then wait many more hours to download and install. Thankfully, those days are over.
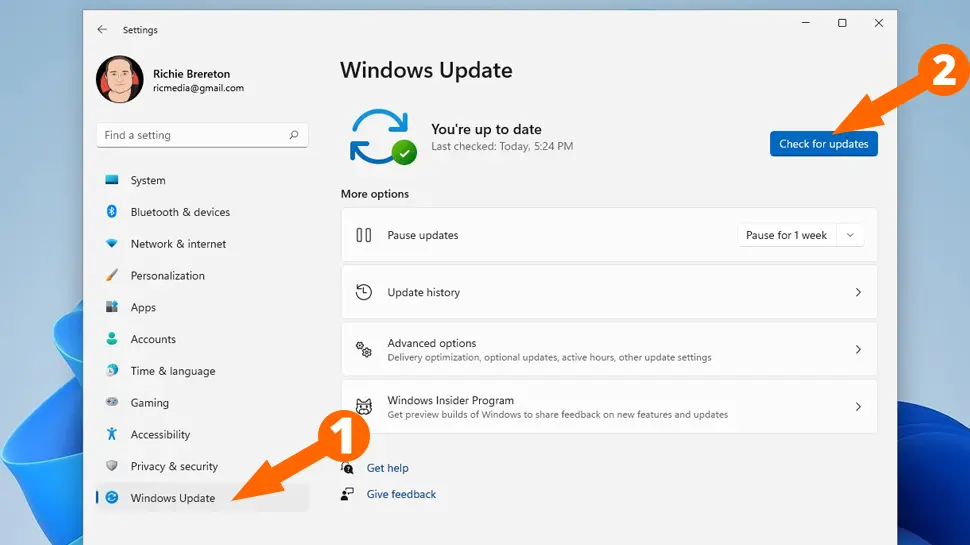
- To update Windows, click Start -> Settings -> Windows Update, then click the Check for updates button.
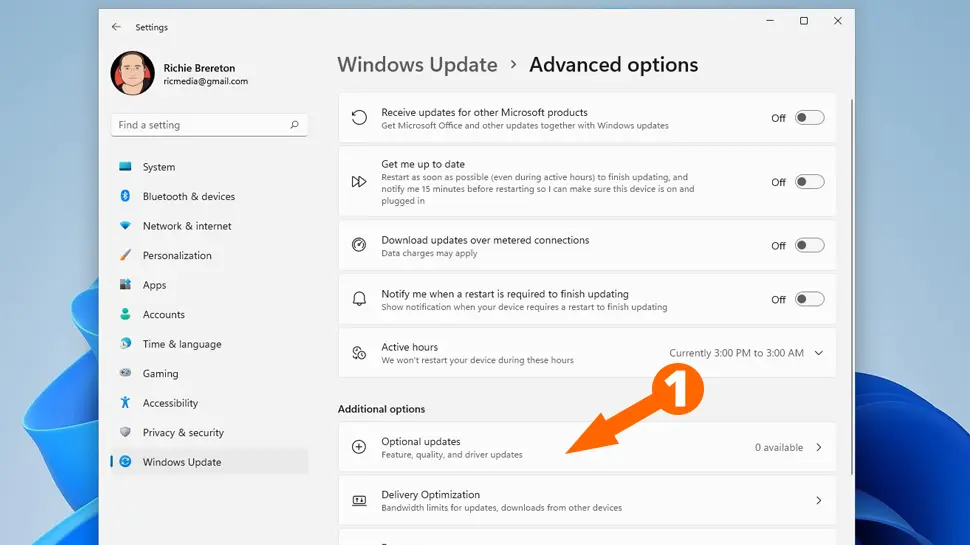
- You can also select optional updates by clicking on Advanced Options -> Optional Updates
Defragment & Optimize Hard Drive
The final step in servicing your Windows PC is to defragment and optimize your system hard drive. This will reorganize data to be more easily accessed, remove old temporary files, and perform other optimization steps.
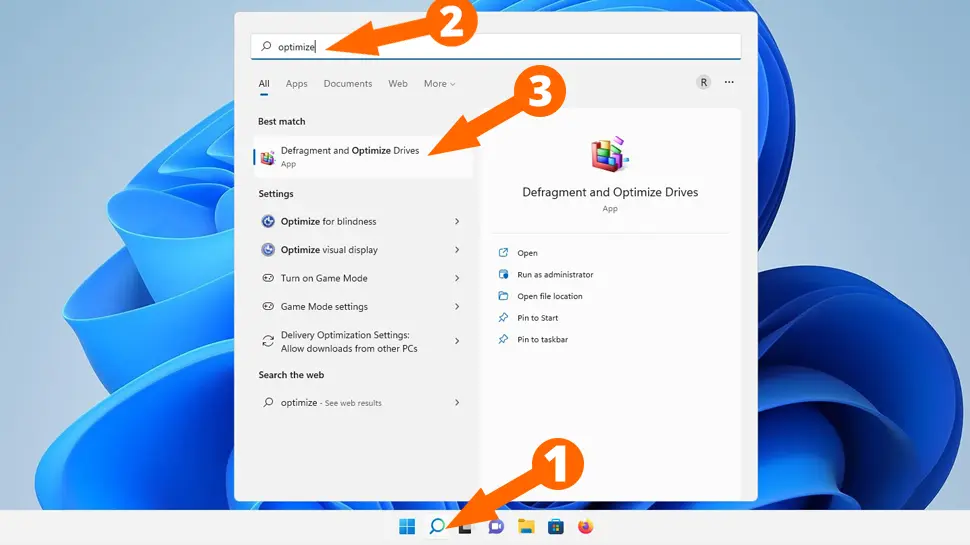
- Click the search icon on your taskbar and search for Optimize in the search box, then click the Defragment and Optimize hard drives result
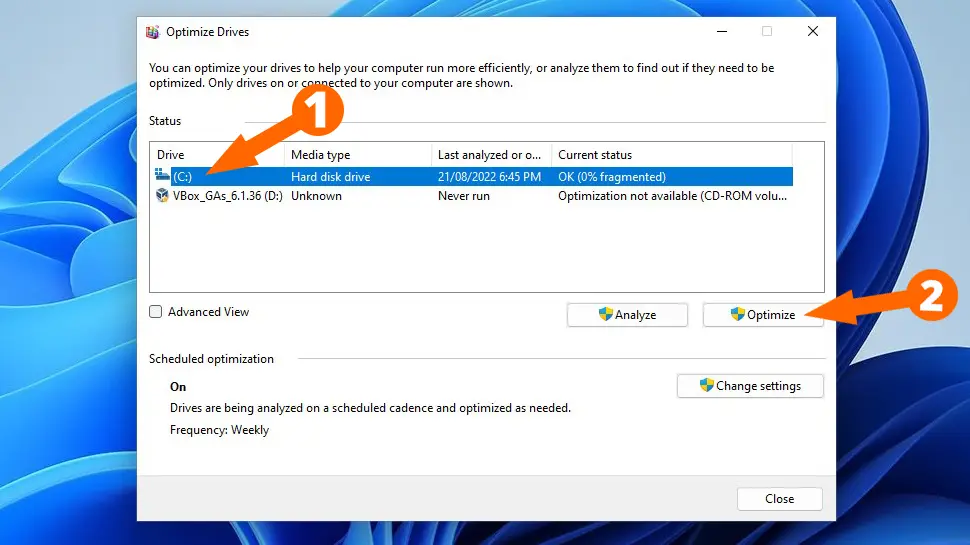
- Select the drive with the Windows logo on it, then click Optimize
After performing all the above steps, be sure to reboot your PC.
Troubleshooting
If your PC is still crashing, you may need to run Disk Check or even refresh or reset your PC.
If your PC is still really slow, you can upgrade the RAM/Memory, and/or get a technician to swap out the mechanical hard drive with a much faster SSD (Solid State Disk) hard drive.
Conclusion
Now you know how to service a Windows PC like a pro. Your PC should now be running perfectly with all drivers and system files updated to their latest versions. If you ran into any issues, hit me up in the comments, or socials/email
See Also
Further Reading
- System File Checker at Microsoft
- DISM Utility at Microsoft
- # Download CCleaner (buy CCleaner Pro or use the free version)
- Defragment and Optimize at Microsoft
Comments
There are currently no comments on this article.
Comment