
Creating a bootable USB drive with Linux is a great way to install a new operating system or run a live Linux distribution. Rufus is a free and open-source utility that can help you create bootable USB drives with ease. In this tutorial, we will guide you through the steps to create a bootable USB drive with Linux using Rufus.
Contents
- Recommended USB Drives
- Step 1: Download Rufus
- Step 2: Download Linux ISO image
- Step 3: Connect USB Drive
- Step 4: Launch Rufus
- Boot Target PC
- Conclusion
- See Also
- Further Reading
Recommended USB Drives
If you don’t already have a quality USB drive, I can highly recommend the following.
- Corsair Flash Survivor Stealth 128GB USB 3.0 Flash Drive
- SanDisk 128GB Ultra USB 3.0 Flash Drive
- SanDisk 128GB Ultra Flair USB 3.0 Flash Drive
- Kingston DataTraveler Exodia Onyx 128GB USB 3.2 Gen 1
- Samsung Type-C USB Flash Drive, 128GB (note this is a Type-C drive so you’ll need a USB Type-C port to use it)
Step 1: Download Rufus
To get started, you need to download Rufus from its official website. Rufus is available for Windows only, so make sure you are using a Windows-based computer.
Step 2: Download Linux ISO image
Once you have Rufus downloaded, you will also need a Linux ISO image. You can download the ISO image from the official website of the Linux distribution you want to use.
- Ubuntu – ubuntu.com/
- Debian – www.debian.org/
- Fedora – getfedora.org/
- Arch Linux – www.archlinux.org/
- CentOS – www.centos.org/
- openSUSE – www.opensuse.org/
- Linux Mint – linuxmint.com/
- Manjaro Linux – manjaro.org/
- Kali Linux – www.kali.org/
- Elementary OS – elementary.io/
Step 3: Connect USB Drive
Connect the USB drive that you want to use as a bootable drive. Make sure that the USB drive is empty, or that any important data has been backed up.
Step 4: Launch Rufus
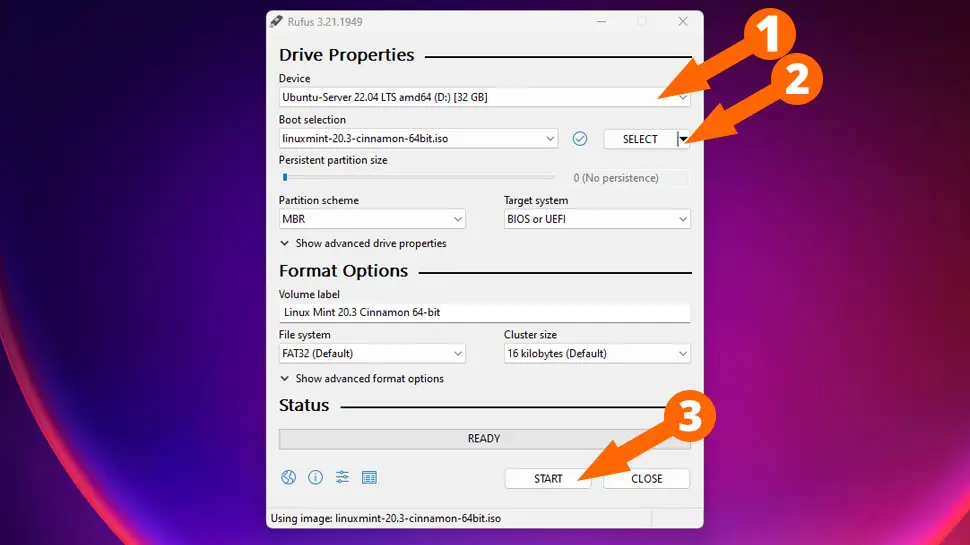
Launch Rufus and select the USB drive that you connected in the previous step.
Step 5: Select ISO image
Next, click on the Select button next to the Boot selection field and choose the Linux ISO image that you downloaded.
Step 6: Configure Rufus
Under the Partition scheme option, select MBR if your computer uses BIOS or GPT if it uses UEFI. Then, under the File system option, select FAT32 or NTFS, depending on the Linux distribution you are using (Rufus usually automatically selects the correct file system). Lastly, leave the Cluster size at its default setting.
Step 7: Start Rufus
Click on the Start button to start the process. Rufus will ask if you want to proceed with the process, click on Yes to continue.
Step 8: Wait for Rufus to complete
Wait for Rufus to complete the process. The time it takes will depend on the size of the Linux ISO image.
Step 9: Eject USB Drive
Once Rufus has finished creating the bootable USB drive, eject the USB drive from your computer.
Boot Target PC
Insert the USB drive into the target computer and switch on. You BIOS/UEFI should automatically detect and run the installation from the USB drive. If you already have another operating system installed and want to overwrite it, reboot and press the boot menu key (usually the F12, Esc, or Del keys).
Conclusion
Creating a bootable USB drive with Linux using Rufus is an easy process. By following the above steps, you can create a bootable USB drive in a matter of minutes. Once you have the bootable USB drive, you can use it to install Linux or run a live distribution. With Rufus, you can create a bootable USB drive with ease and get started with Linux.
See Also
- How to Create a Windows 10 Bootable USB Drive – Tutorial
- Top 10 Keyboard Shortcuts for Linux
- Top 15 Linux Bash Commands
- How to install Debian Linux – Complete Guide
Comments
There are currently no comments on this article.
Comment