

.p Today I’ll show you how to secure your LAMP server from hackers and malicious bots. If you’ve been following my Ultimate LAMP Web Server on Ubuntu 22.04 series, this is a crucial step not to be missed. There are a ton of threats out there always looking to exploit a vulnerable web server, but today we’ll make sure yours is not a one of them. If you’re on a development server installed locally, you probably don’t need to do this step, but if you have a cloud server, then definitely do.
Contents
- Prerequisites
- Enable Automatic Updates
- Configure UFW Firewall
- Install Fail2Ban
- Hide Apache Information
- Install & Configure mod_security
- Install & Configure mod_evaisive
- Secure MySQL
- Secure PHP
- Conclusion
- See Also
- Further Reading
Prerequisites
- A cloud server (DigitalOcean, Vultr or DreamHost) with a non-root user (see my Initial server set up guide)
- A LAMP stack installed and configured (see my guide How to install a LAMP stack on Ubuntu 22.04)
- A domain name (buy one for $0.99 cents from Namecheap) with DNS configured and setup on Apache Virtual Hosts (see my guide How to set up Apache Virtual Hosts on Ubuntu 22.04)
- An SSL certificate installed for your domain (see How to install a Let’s Encrypt SSL certificate on Apache and Ubuntu 22.04)
Enable Automatic Updates
Let’s enable automatic updates for Ubuntu and all installed components. We do this by installing a package called unnatended-upgrades and then configure what packages will be automatically updates (Unattended Upgrades may already be installed as in Ubuntu 22.04):
sudo apt install unattended-upgradesNext we check if the unattended-upgrades service is running:
sudo systemctl status unattended-upgrades.service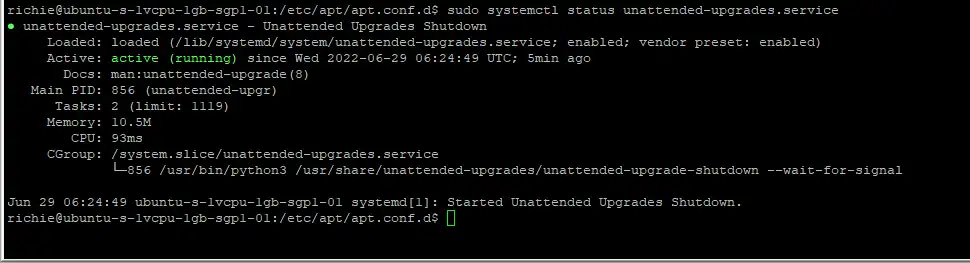
The open the configuration file:
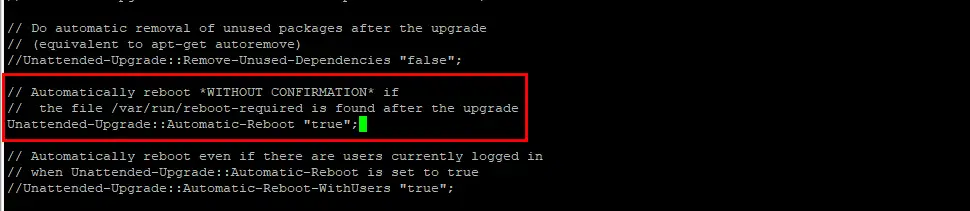
sudo nano /etc/apt/apt.conf.d/50unattended-upgradesThe default configuration is great for most servers. There is only one option I recommend you change which is “reboot after upgrade”. This option will reboot if any packages require it. Scroll down and remove the two slashes // from this line, then change false to true:
Then save ctrl + o, ENTER and exit nano ctrl + x.
You’ll need to restart the unattended-upgrades service:
sudo systemctl restart unattended-upgrades.serviceConfigure UFW Firewall
Ubuntu has a built-in firewall called Uncomplicated Firewall or UFW. This package is excellent for securing your web server, so let’s configure and enable the service. For those of you who setup your LAMP server using my guide, UFW will already be configured, so you can skip this section.
Let’s see what rules are available:
sudo ufw app list
We want to make a rule for OpenSSH first (it may already be enabled, it will tell you if it is):
sudo ufw allow OpenSSHFor Apache, you have three choices:
- Apache – Opens just port 80 (insecure)
- Apache Secure – Opens just port 443 (SSL secure)
- Apache Full – Opens both ports 80 and ports 443
I recommend Apache Secure if you have an SSL certificate installed, otherwise use Apache Full
sudo ufw allow in "Apache Secure"OR
sudo ufw allow in "Apache Full"Let’s see what rules are enabled:
sudo ufw status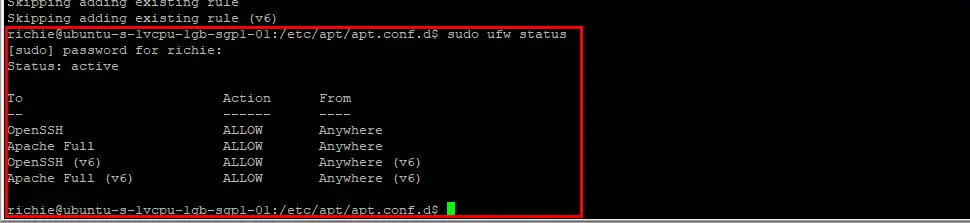
If you see OpenSSH and Apache Full or Apache Secure, you’re safe to enable the UFW service:
sudo ufw enableInstall Fail2Ban
Fail2Ban is a security service that scans log files to detect malicious behavior and bans/blocks the users IP address. Let’s install and configure the Fail2Ban service:
sudo apt install fail2banBefore we edit the configuration file, let’s copy it so it’s not overwritten by system upgrades:
sudo cp /etc/fail2ban/jail.conf /etc/fail2ban/jail.localLet’s edit the new config file:
sudo nano /etc/fail2ban/jail.local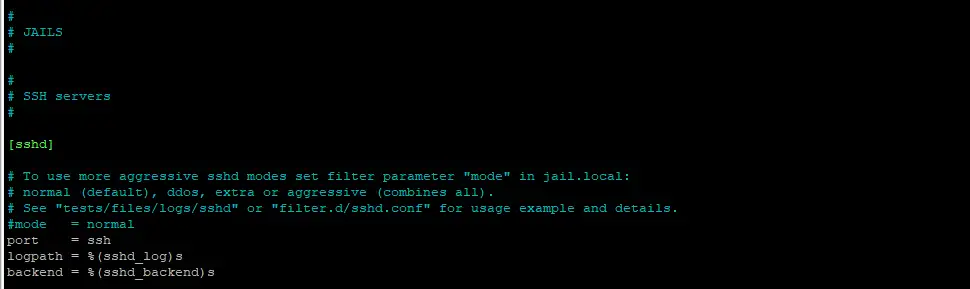
Change the [sshd] section to the following (this will give a maximum password retry of 5 before the user is banned for 1 day):
[sshd]

enabled  = true
port     = ssh
filter   = sshd
logpath  = /var/log/auth.log
maxretry = 5
bantime = 1d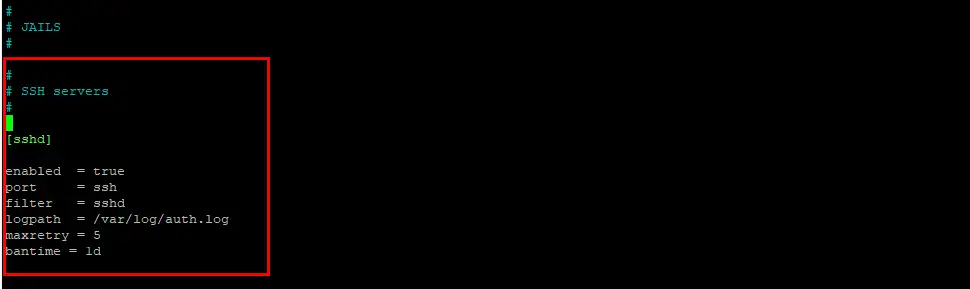
Then save ctrl + o, ENTER and exit nano ctrl + x.
Let’s restart the Fail2Ban service:
sudo systemctl restart fail2banThen we enable the Fail2Ban service at boot:
sudo systemctl enable fail2ban.serviceHide Apache Information
By default, Apache shows way too much information on error pages and headers, so let’s turn those options off, and disable directory listings by default. First, we create a custom config file with nano:
sudo nano /etc/apache2/conf-available/lockdown.confThe copy/paste the following code inside the new document:
ServerTokens Prod
ServerSignature Off
TraceEnable Off
Options all -Indexes
Header unset ETag
Header always unset X-Powered-By
FileETag None
Then save ctrl + o, ENTER and exit nano ctrl + x.
Let’s enable the mod_headers module:
sudo a2enmod headersLoad the new configuration file:
sudo a2enconf lockdown.confThe restart Apache:
sudo systemctl restart apache2Install & Configure mod_security
The Apache mod_security module is a signature-based firewall that detects attacks like Cross Site Scripting, session hijacking, SQL injections and other malicious attacks. Let’s install the module and then configure it:
sudo apt install libapache2-mod-security2Make a copy of the default configuration file:
sudo cp /etc/modsecurity/modsecurity.conf-recommended /etc/modsecurity/modsecurity.confOpen the new config file with nano:
sudo nano /etc/modsecurity/modsecurity.confThen edit to change SecRuleEngine DetectionOnly to SecRuleEngine On:
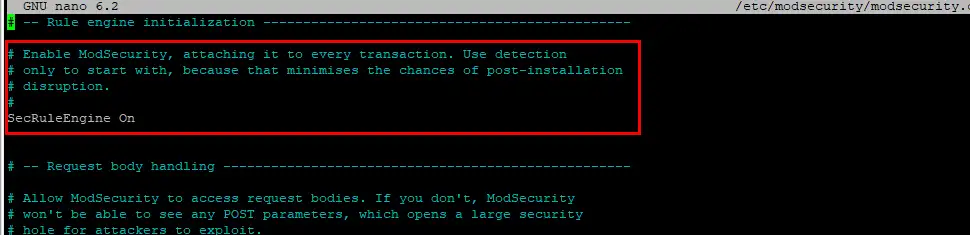
Then save ctrl + o, ENTER and exit nano ctrl + x.
We then restart apache:
sudo systemctl restart apache2Download OWASP Core Rule Set
Visit the CoreRuleSet.org website to determine the latest release, then replace the URL with the latest version:
cd /tmpwget https://github.com/coreruleset/coreruleset/archive/refs/tags/v3.3.2.tar.gzExtract the file:
tar -xvf v3.3.2.tar.gzMove the CRS setup example to your Mod Security directory:
sudo mv coreruleset-3.3.2/crs-setup.conf.example /etc/modsecurity/crs-setup.confThen copy the rules directory to the Mod Security directory too:
sudo mv coreruleset-3.3.2/rules/ /etc/modsecurity/Edit your Apache configuration file to enable loading of the rules:
sudo nano /etc/apache2/mods-enabled/security2.confYou should already have the line below, if not, add it:
IncludeOptional /etc/modsecurity/*.confThen add this line underneath it:
Include /etc/modsecurity/rules/*.confComment out the last line:
# IncludeOptional /usr/share/modsecurity-crs/*.load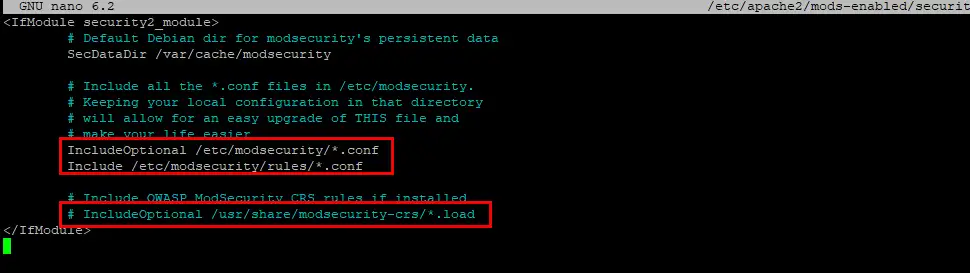
Then save ctrl + o, ENTER and exit nano ctrl + x.
Open your websites Virtual Host file and add the following line between <VirtualHost: *:443> brackets:
SecRuleEngine On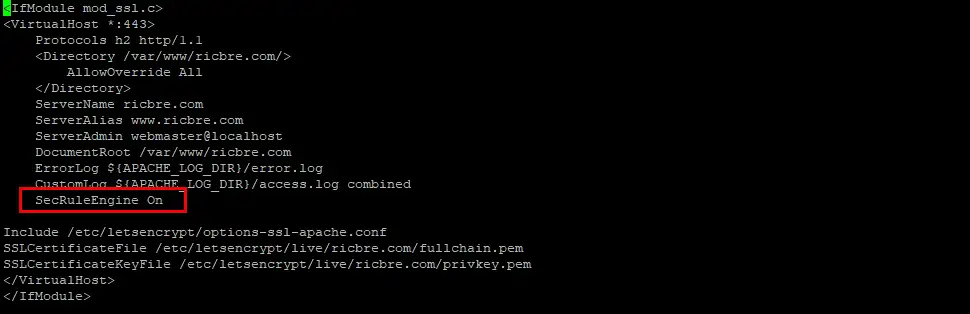
Then save ctrl + o, ENTER and exit nano ctrl + x.
To apply the new rules, restart Apache:
sudo systemctl restart apache2Let’s check if mod_security is up and running:
sudo apachectl -M | grep security
Let’s test if mod_security is working. Copy/past the following code but replace <SERVER-IP/DOMAIN> with your servers IP or domain name:
curl https://<SERVER-IP/DOMAIN>/index.php?exec=/bin/bashYou should get a 403 Forbidden page:

Install & Configure mod_evaisive
mod_evasive is an Apache module used to protect your web server from DOS (Denial of Service) and DDOS (Distributed Denial of Service) attacks, along with other brute-force tactics hackers use. Let’s install and configure mod_evasive:
sudo apt install libapache2-mod-evasiveOpen the mod_evasive configuration file:
sudo nano /etc/apache2/mods-enabled/evasive.confUncomment the lines as shown below and leave all settings at default except for email address, which you should change to your own:
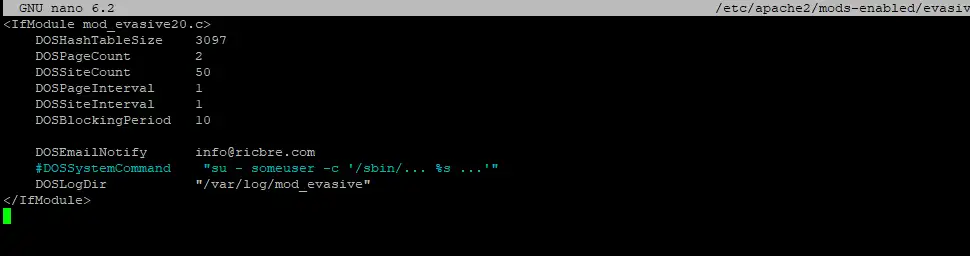
Then save ctrl + o, ENTER and exit nano ctrl + x.
Let’s create a log file directory for mod_evasive, change permissions, then restart Apache:
sudo mkdir /var/log/apache2/mod_evasivesudo chown -R www-data: /var/log/apache2/mod_evasivesudo systemctl restart apache2Then we check mod_evasive is enabled:
sudo apachectl -M | grep evasive
Let’s test that mod_evasive is working by using the test script. You should get 400 Bad Request error messages:
perl /usr/share/doc/libapache2-mod-evasive/examples/test.pl
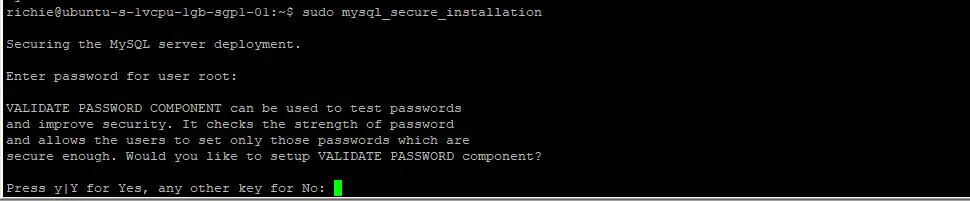
Secure MySQL
If you haven’t yet run mysql_secure_installation, let’s run it now. This security hardening script will greatly increase your MySQL installation’s protection from hackers. If you’ve been following my guide The Ultimate Web Server, then you will already have set a MySQL root password and configured MySQL, so you can skip this step.
Login to MySQL using your Ubuntu root password:
sudo mysql -uroot -pThen set a MySQL root password, replacing MyPassword with your own strong password:
ALTER USER 'root'@'localhost' IDENTIFIED WITH mysql_native_password by 'MyPassword';exit;Now you can run mysql_secure_installation:
sudo mysql_secure_installationYou will presented with the Validate Password Component first. This component can enforce strong passwords for all MySQL users. I usually choose to disable this in testing mode, but if you’re planning on using your server for a production environment, definitely enable it. If you do enable it, you’ll need to choose from three different levels of password complexity: low, medium and strong.
I suggest answering the questions as follows:
- VALIDATE PASSWORD COMPONENT – N or Y
- Change the password for root ? – N
- Remove anonymous users? – Y
- Disallow root login remotely? – Y
- Remove test database and access to it? – Y
- Reload privilege tables now? – Y
Secure PHP
And finally, we secure the PHP environment because by default, PHP has some security issues. This section should only be done for production servers, if you’re in development, you can safely skip the entire PHP section.
Let’s find your loaded php.ini configuration file and open it:
php --ini | grep "Loaded Configuration File"
sudo nano /etc/php/8.1/cli/php.iniWe will be changing the settings for a number of options, so to make it easier to find them, copy the option name (i.e. expose_php) to clipboard, then go back to nano and press ctrl + w, then paste the option and hit Enter, which will search the document and find the option for you. Otherwise it takes forever to find different options.
First, we disable remote code execution, then hide some information that PHP can give hackers, and set maximum execution time and memory limit for scripts:
allow_url_fopen = Off
allow_url_include = Off
expose_php = Off
display_errors = Off
mail.add_x_header = Off
max_execution_time = 30
max_input_time = 30
memory_limit = 40M
Then we disable some PHP functions that are potentially dangerous:
disable_functions = shell_exec,passthru,exec,phpinfo,popen,show_source,system,proc_open,allow_url_fopen,curl_exec,curl_multi_execThen save ctrl + o, ENTER and exit nano ctrl + x.
To apply the changes, restart Apache:
sudo systemctl restart apache2Conclusion
I hope everything went well and your web server is now tightly secured. If you had any issues, hit me up in the comments, or socials/email.
See Also
- Initial server set up on Ubuntu 22.04 cloud instance
- How to install LAMP stack on Ubuntu 22.04
- How to configure Apache Virtual Hosts on Ubuntu 22.04
- How to install a free Let’s Encrypt SSL certificate on Ubuntu 22.04 LAMP stack
- How to enable HTTP/2 on Ubuntu 22.04 LAMP stack
- How to install phpMyAdmin on Ubuntu 22.04 LAMP stack
- How to install WordPress on Ubuntu 22.04 LAMP stack
Comments
Gary Wright #
I’ve been following your wonderfully created tutorials on setting up an Ubuntu 22.04 web server. All has been going great until I got to Download OWASP Core Rule Set, particularly towards the end of that section with sudo systemctl. restart apache2.
I get the following error: Job for apache2.service failed because the control process exited with error code.
See “systemctl status apache2.service” and “journalctl -xeu apache2.service” for details.
When I run systemctl status apache2.service I get the following:
× apache2.service – The Apache HTTP Server Loaded: loaded (/lib/systemd/system/apache2.service; enabled; vendor preset: enabled) Active: failed (Result: exit-code) since Thu 2022-08-18 20:23:02 UTC; 8s ago Docs: https://httpd.apache.org/docs/2.4/ Process: 1291 ExecStart=/usr/sbin/apachectl start (code=exited, status=1/FAILURE) CPU: 27ms
Aug 18 20:23:02 ip-172-31-17-162 systemd[1]: Starting The Apache HTTP Server…
Aug 18 20:23:02 ip-172-31-17-162 apachectl[1294]: apache2: Syntax error on line 147 of /etc/apache2/apache2.conf: Syntax er>
Aug 18 20:23:02 ip-172-31-17-162 apachectl[1291]: Action ‘start’ failed.
Aug 18 20:23:02 ip-172-31-17-162 apachectl[1291]: The Apache error log may have more information.
Aug 18 20:23:02 ip-172-31-17-162 systemd[1]: apache2.service: Control process exited, code=exited, status=1/FAILURE
Aug 18 20:23:02 ip-172-31-17-162 systemd[1]: apache2.service: Failed with result ‘exit-code’.
Aug 18 20:23:02 ip-172-31-17-162 systemd[1]: Failed to start The Apache HTTP Server.
line 147 of /etc/apache2/apache2.conf reads: IncludeOptional mods-enabled/*.conf
any ideas?
Richie Brereton (Author) #
Hi Gary, sorry for the late reply (long story but to do with new CMS). Did you finish up working out a solution? I can’t find anything when searching the error, so if you could look in the apache log:
/var/log/apache2/error.logand see if it gives the specific error? cheers, RichComment