
WordPress is by far the most popular Content Management System (CMS) in the world with over 455 million websites using it, and with over 55,000 plugins available, it’s extremely flexible too. Today’ I’ll show you how to install WordPress on an Ubuntu 22.04 LAMP stack.
This article is part of my series The Ultimate Web Server.
Contents
- Prerequisites
- Create a new MySQL Database & User
- Install Required PHP Extensions
- Allow .htaccess Files in Apache
- Download and Install WordPress
- Configure Directory & File Permissions
- Setting up the WordPress Config File
- Installing WordPress
- Conclusion
- See Also
- Further Reading
Prerequisites
- An Ubuntu 22.04 cloud server (DigitalOcean, Vultr or DreamHost) and a non-root user with
sudoprivileges (See Initial server set up guide) - The server should have a LAMP stack installed and configured (see my guide How to install a LAMP stack on Ubuntu 22.04)
- A registered domain name (Buy one for $0.99 cents from Namecheap)
- An SSL certificate installed (see my guide How to install a free Let’s Encrypt SSL certificate)
Create a new MySQL Database & User
Before we start uploading files, we need to create a new MySQL database and user for your WordPress installation. Open your SSH client and login to your server with a non-root user with sudo privileges. Then we login to the MySQL:
sudo mysql -uroot -pNext, we create a database for WordPress. I am calling my database wpress but you can call it anything you like:
CREATE DATABASE wpress DEFAULT CHARACTER SET utf8 COLLATE utf8_unicode_ci;Let’s create a MySQL user for WordPress and grant privileges required to access the WordPress database, then flush privileges, and exit MySQL. My users name is wpuser, but you can use any name you like. Replace password with a strong password of your choosing:
CREATE USER 'wpuser'@'%' IDENTIFIED WITH mysql_native_password BY 'password';GRANT ALL ON wpress.* TO 'wpuser'@'%';FLUSH PRIVILEGES;EXIT;Install Required PHP Extensions
WordPress requires certain PHP extensions to be installed. Let’s update the package cache first, install required extensions, and restart Apache. If a module is already installed, the apt package manager will simply skip it:
sudo apt updatesudo apt install php-curl php-gd php-xml php-xmlrpc php-mbstring php-soap php-intl php-zipsudo systemctl restart apache2Allow .htaccess Files in Apache
If you’re following my guide The Ultimate Web Server then you will already have a website set-up with an SSL certificate, Apache Virtual Hosts, and a .conf file inside the /etc/apache2/sites-available/ folder (in my guide I use /etc/apache2/sites-available/ricbre.com.conf).
If you haven’t setup Virtual Hosts, you will need to edit the default configuration file located in /etc/apache2/sites-available/000-default.conf and upload files to the default /var/www/html directory instead.
Open your websites configuration file replacing ricbre.com with your website file (or the default file 000-default.conf). If you have already installed Let’s Encrypt SSL certificate, the default .conf file with be ricbre.com-le-ssl.conf (replace ricbre.com with your website):
sudo nano /etc/apache2/sites-available/ricbre.com-le-ssl.confUnder the <VirutalHost *:443> grouping, copy and paste the following code replacing ricbre.com with your websites directory (found under /var/www/ folder):
    <Directory /var/www/ricbre.com/>
        AllowOverride All
    </Directory>
Then save ctrl + o, ENTER and exit nano ctrl + x and restart Apache:
Enabling Mod-Rewrite
WordPress makes use of the Apache mod_rewrite module for pretty permalinks, so instead of https://www.ricbre.com/?p=123 you can have more human-readable URLs like https://www.ricbre.com/sample-post/. Let’s enable them:
sudo a2enmod rewriteNow let’s test the new configuration:
sudo apache2ctl configtest
You should see Syntax OK. If not, go back to your websites .conf file and make sure the directives are correct. Let’s restart Apache to implement the changes:
sudo systemctl restart apache2Download and Install WordPress
We will be downloading WordPress to a temporary location, then create some configuration files, and finally copy the directory to your websites root folder. Head over to the writeable /tmp directory:
cd /tmpDownload the latest WordPress release:
curl -O https://wordpress.org/latest.tar.gzExtract the compressed folder use the built-in tar archiver:
tar xzvf latest.tar.gzCreate a blank .htaccess file inside the new WordPress directory:
touch /tmp/wordpress/.htaccessCreate the configuration file by copying the sample config file:
cp /tmp/wordpress/wp-config-sample.php /tmp/wordpress/wp-config.phpCreate an upgrade folder so WordPress doesn’t run into any permission errors later:
mkdir /tmp/wordpress/wp-content/upgradeNow copy the WordPress folder into your website root folder. In my case it’s /var/www/ricbre.com. Replace ricbre.com with your folder name:
sudo cp -a /tmp/wordpress/. /var/www/ricbre.comConfigure Directory & File Permissions
By default, the files and folders we just copied over are owned by your non-root user, but we need them to be owned by the web server account www-data. We also need to change file and folder permissions for WordPress to work:
First, we change ownership of all the files and folders using the chown command:
sudo chown -R www-data:www-data /var/www/ricbre.comNow change folder/directory permissions to 755 using the chmod command:
sudo find /var/www/ricbre.com/ -type d -exec chmod 755 {} \;Then change file permissions to 644:
sudo find /var/www/ricbre.com/ -type f -exec chmod 644 {} \;Setting up the WordPress Config File
WordPress provides a free tool to create a unique “Salt” or secret keys that are used to secure your WordPress installation. Enter the following code to generate your unique keys:
curl -s https://api.wordpress.org/secret-key/1.1/salt/
Copy the generated data to clipboard and paste them into a text file on you local PC, then open the WordPress configuration file:
sudo nano /var/www/ricbre.com/wp-config.phpUsing your arrow keys, scroll down to the “Authentication and salt keys” section, and copy and paste the generated values to the corresponding lines inside the ‘put your unique phrase here’ brackets (i.e. “AUTH_KEY” value to “AUTH_KEY” line).
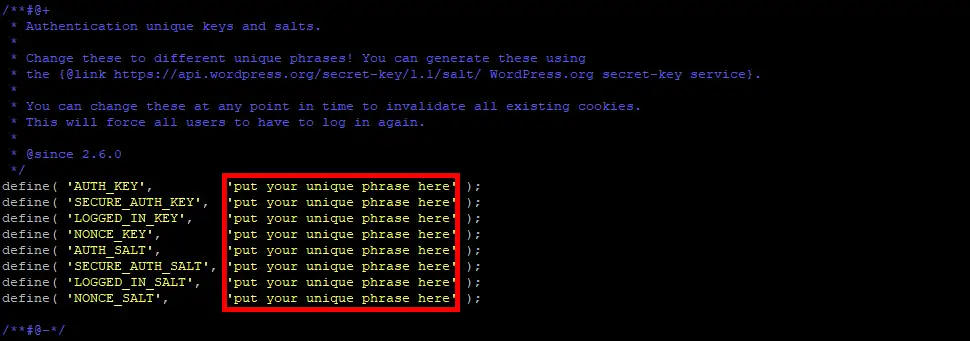
It should look similar to this:

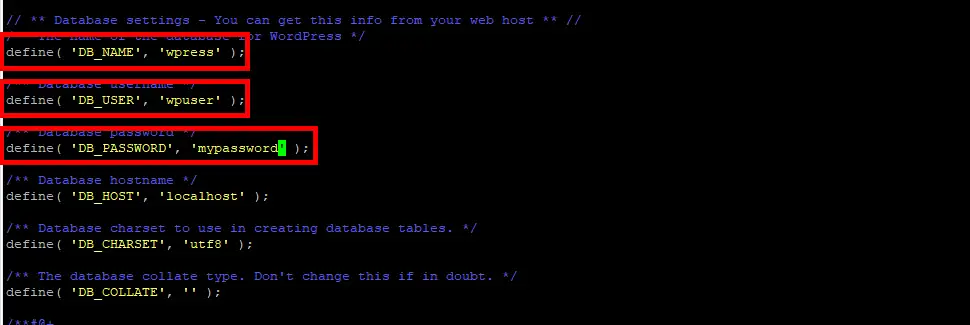
Scroll up to the Database Settings and enter your database information (replace my values with your own):
- Database name –
wpress - Database User –
wpuser - Database Password –
password
For extra security, add some random numbers or letters to your table prefix so it’s not easy for a hacker to guess. Scroll down to the Table Prefix section and add either numbers or letters between wp and the underscore _:

If you’ve been following my guide The Ultimate Web Server you may have an index.html file inside your website’s root folder. We need to delete it:
sudo rm -rf /var/www/ricbre.com/index.htmlInstalling WordPress
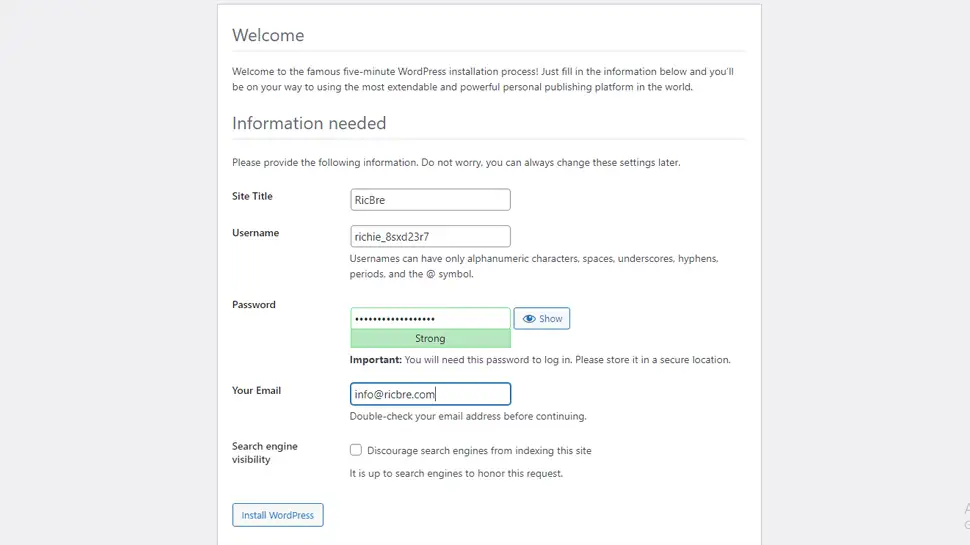
Open your web browser and enter your website URL. In my case it’s https://www.ricbre.com/. You’ll be presented with the WordPress installation page. Choose your language, then enter your information (be sure to record your username and password). Some tips on usernames and passwords:
- Always append a username with random data (numbers and letters) and never use “Admin” or “Administrator” as they’re easy to guess. A good username for me would be:
richie_8sxd23r7 - Use a strong password with letters, numbers and special characters. WordPress can generate one for you. Click the “Show” button and keep a record of it
Once you have finished entering your information, click the “Install WordPress” button. You will then be asked to login with your new user.
Conclusion
Hopefully everything worked and you have a brand new WordPress website up and running. Why not head over to my next guide in The Ultimate Web Server series: How to enable HTTP/2 on an Apache LAMP server with Ubuntu 22.04.
See Also
- Initial server set up on Ubuntu 22.04 cloud instance
- How to install LAMP stack on Ubuntu 22.04
- How to configure Apache Virtual Hosts on Ubuntu 22.04
- How to install a free Let’s Encrypt SSL certificate on Ubuntu 22.04 LAMP stack
- How to enable HTTP/2 on Ubuntu 22.04 LAMP stack
- How to install phpMyAdmin on Ubuntu 22.04 LAMP stack
- How to secure an Ubuntu 22.04 LAMP Stack
Comments
There are currently no comments on this article.
Comment